Author’s Guide
v0.1.0-alpha.1Understory Documentation
Everything you need to know to get started and go deep. Start with What Understory is or jump straight to your first 30 minutes.
Getting Started
What Understory is
Think of Understory as two tools in one: a sandbox game design environment and a modern prose editor, connected by the event ledger.
The game design side is where you build your world’s rules: character templates, stat systems, item databases, skill trees, faction relationships. Everything that normally lives in a spreadsheet or a custom doc that only you can fully read.
The prose editor side is where you write. A full-featured manuscript editor with chapters, scenes, focus mode, and word sprints. The whole thing.
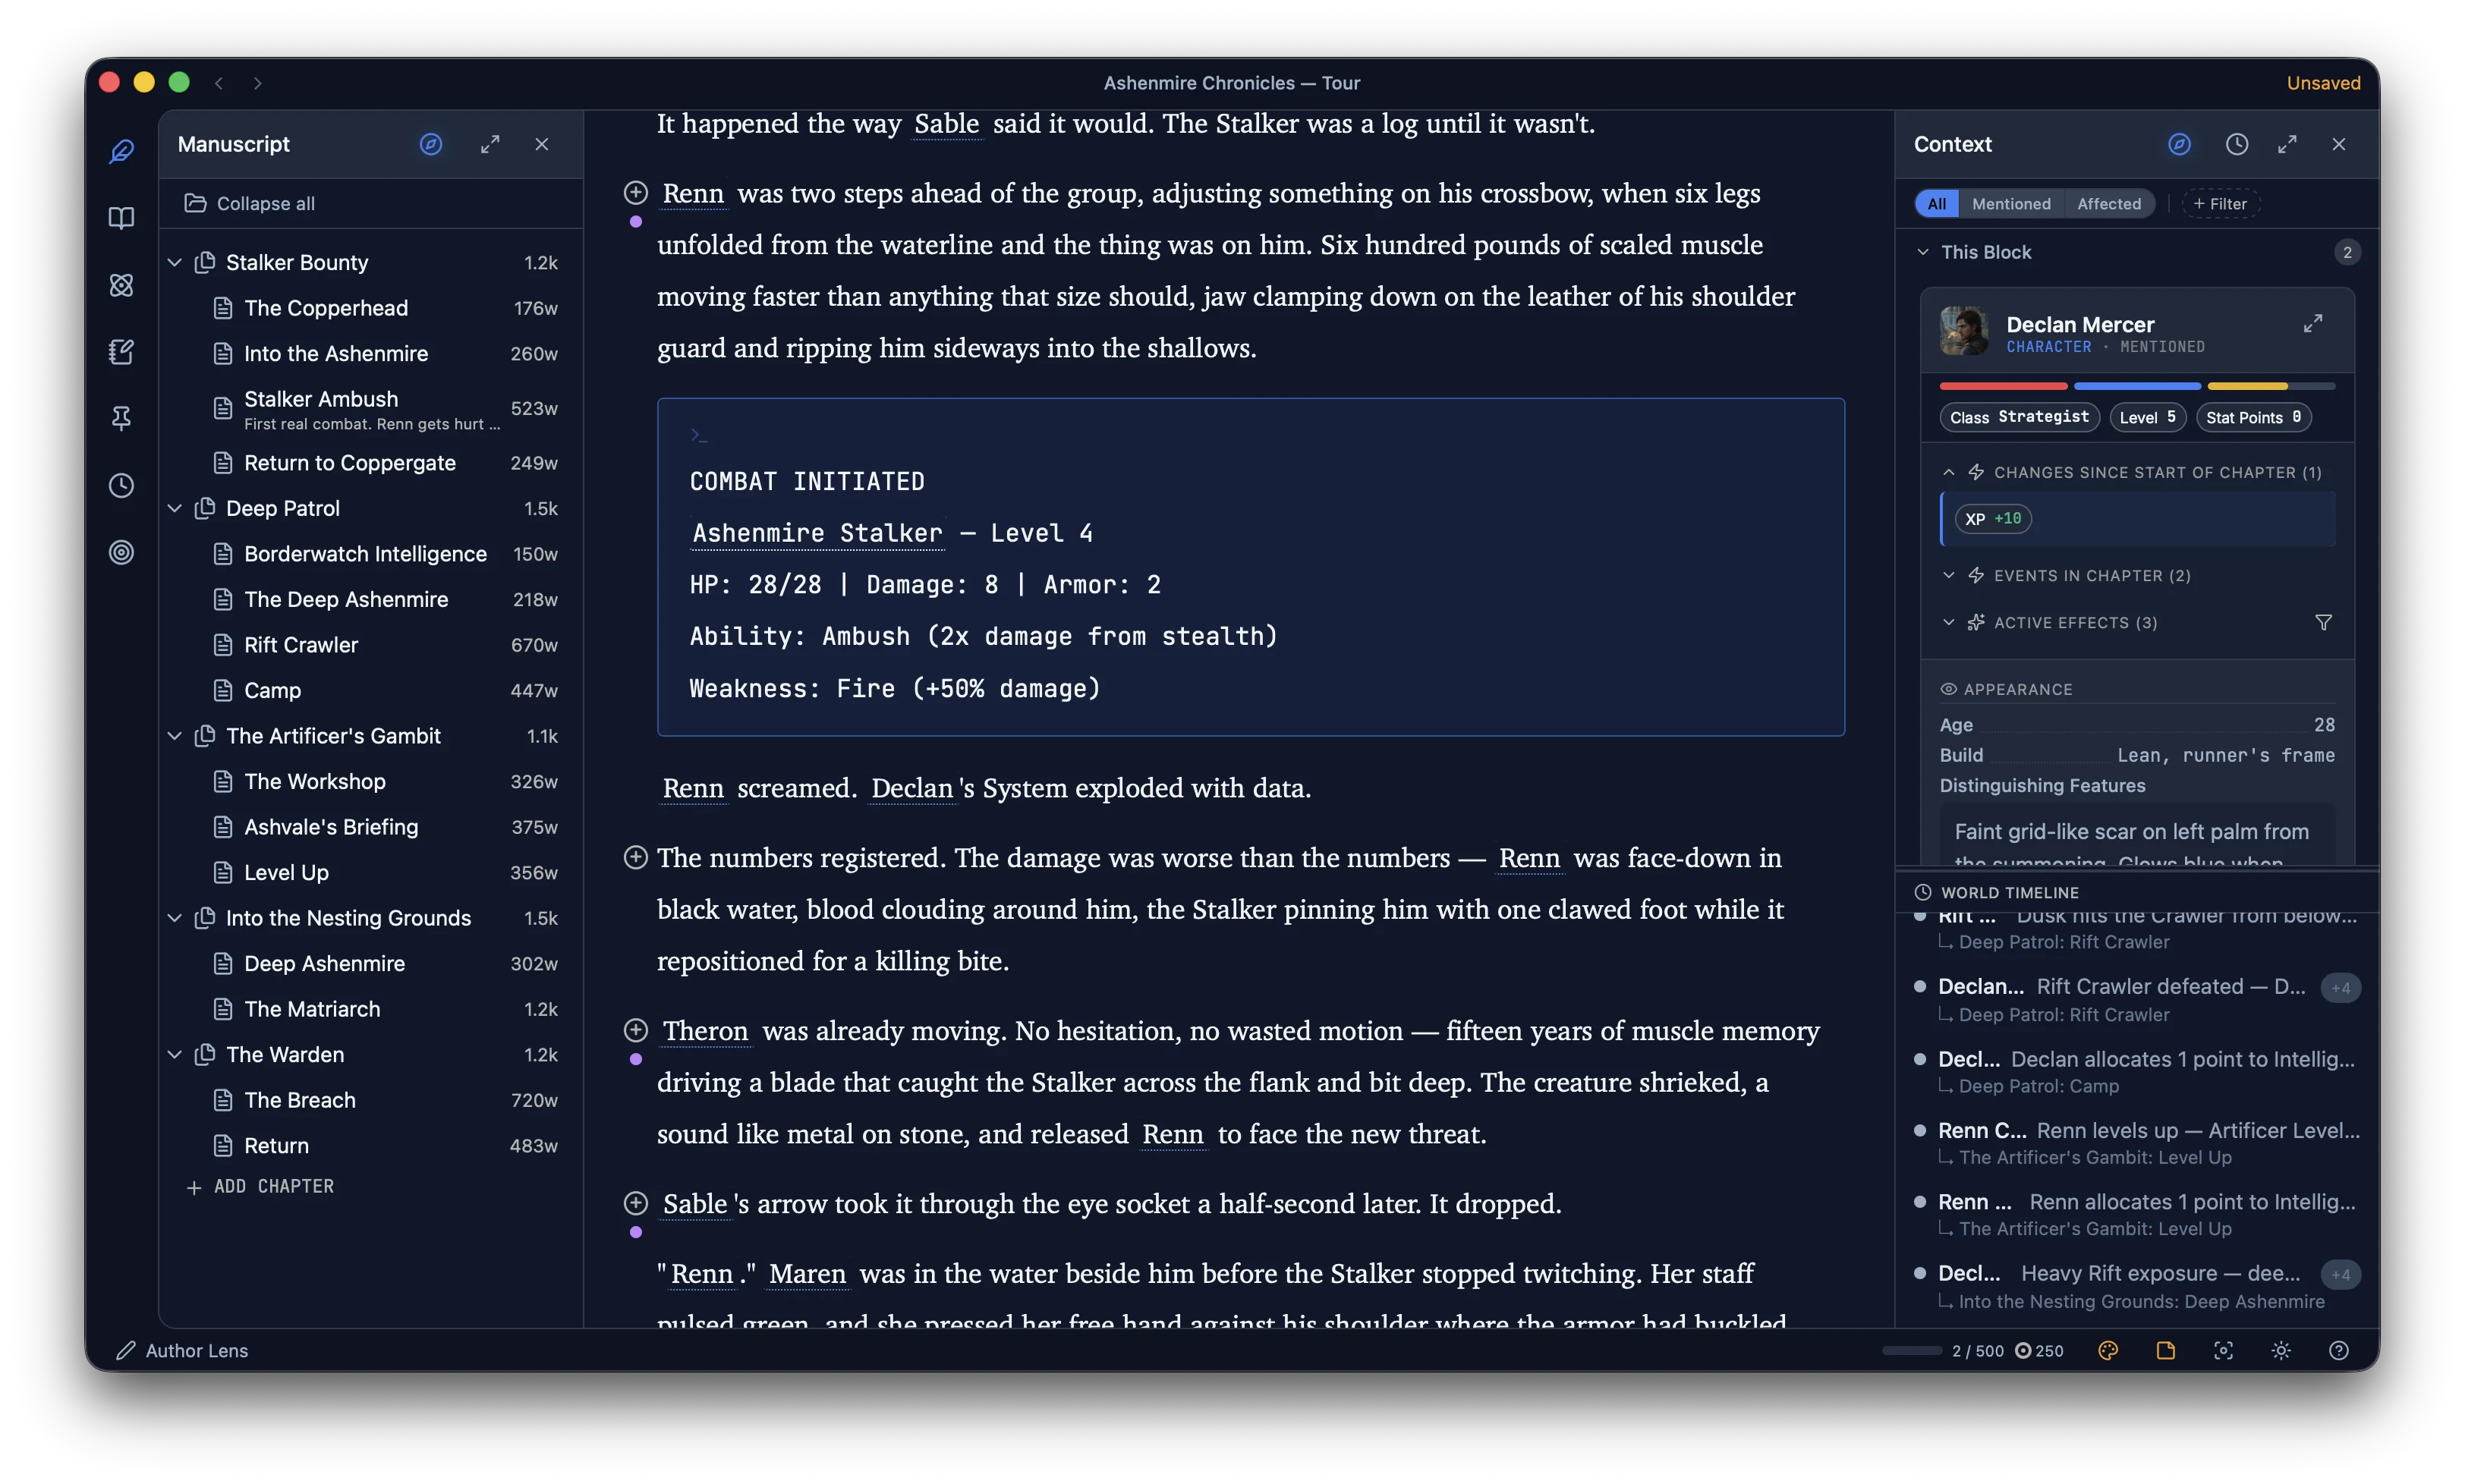
The event ledger connects them. Every stat change, level-up, loot drop, or status applied is recorded there and linked to a specific moment in your manuscript. That link is what makes everything else in the app meaningful: the Context Panel knows which entities are in this scene and what they look like right now. The hover card shows a character’s HP at exactly this sentence. Every view in Understory is a different window into the relationship between your world model and your prose.
Most LitRPG authors already have both halves. The game design stuff is in a spreadsheet. The prose is in Scrivener or Google Docs. They don’t talk to each other. Understory is what happens when they’re the same app.
Three concepts make this work:
Entities
The discrete things in your world: characters, locations, items, monsters, factions, skills. Each entity is a structured record with typed properties and a full history of changes.
The Universe
The rules of your world: what kinds of things exist, what properties they have, and how they relate to each other. Templates, property groups, relationships, and progression tracks all live here.
The Event Ledger
A sequenced record of every change to your world: every stat change, level up, item acquired, or status applied. Entity state is never stored directly; it is always computed from this ledger. This is what makes time-travel and world-time projection possible.
The Lexicon, Timeline, Corkboard, and Journal are all views into this data. They don’t store anything themselves. They surface what’s already in your entities and event ledger from different angles.
Your first 30 minutes
Understory is a complex app. This walkthrough gets you to your first working entity and your first recorded event. Those two things unlock everything else.
Create a new project
.weave file. A vocabulary pack dialog appears. Apply the LitRPG vocabulary pack to seed your project with 11 event types and 14 actions (level-up, combat, loot drops, and more), or skip and start completely blank. You can apply it later from the command palette.Create your first template in the Universe
Create your first entity using the wizard
Write something in the editor and watch the entity get detected
Record your first event
Hover the name and see the state at that point
Core Concepts
Entities and Templates
Templates
A template is a reusable blueprint that defines the structure an entity takes when created. It specifies which property groups the entity has, what composition slots it offers (e.g. a Character has a Race slot and a Class slot), and what attachment groups appear on its sheet (equipment slots, inventory grids, ability lists).
Entity sheets are always rendered from the current template definition. Add a property group to a template and it immediately appears on all existing entities built from that template, with empty values until events populate them. Remove a group from a template and it disappears from existing entities too. The template is the live source of structure; entities own their values, not their shape.
Property Groups
Property groups are named sets of typed properties: Number, String, Formula, Boolean, Entity Link, or Value Set. Groups are defined once in the Universe and shared across templates. An Ability Scores group can appear on both a Character and an NPC template; editing the group once updates both.
Composition Slots
Composition slots are typed positions that accept other entities. A Character slot for Race accepts any entity built from the Race template. When you fill a slot, the slotted entity’s property groups merge onto the source entity’s sheet. A Dark Elf race entity’s Racial Bonuses appear on the character’s sheet automatically.
Relationships
Relationships are typed, structured links between entities with defined behavior. A character equipping a sword is a relationship. So is a rivalry between two characters, or a spell fused from two component spells. See Relationships below for how to define your own relationship types and link entities together.
Progression Tracks
Progression tracks model any kind of advancement through defined milestones: XP leveling, faction reputation, weapon sentience stages, qi core compression. Each tier has optional requirements (property thresholds, event counts) and rewards (stat bonuses, new abilities). Advancement is always triggered by the author. The system flags when requirements are met, never auto-advances. Rewards can have prerequisites, creating a directed skill tree: Swordsmanship I must be unlocked before Swordsmanship II.
Relationships
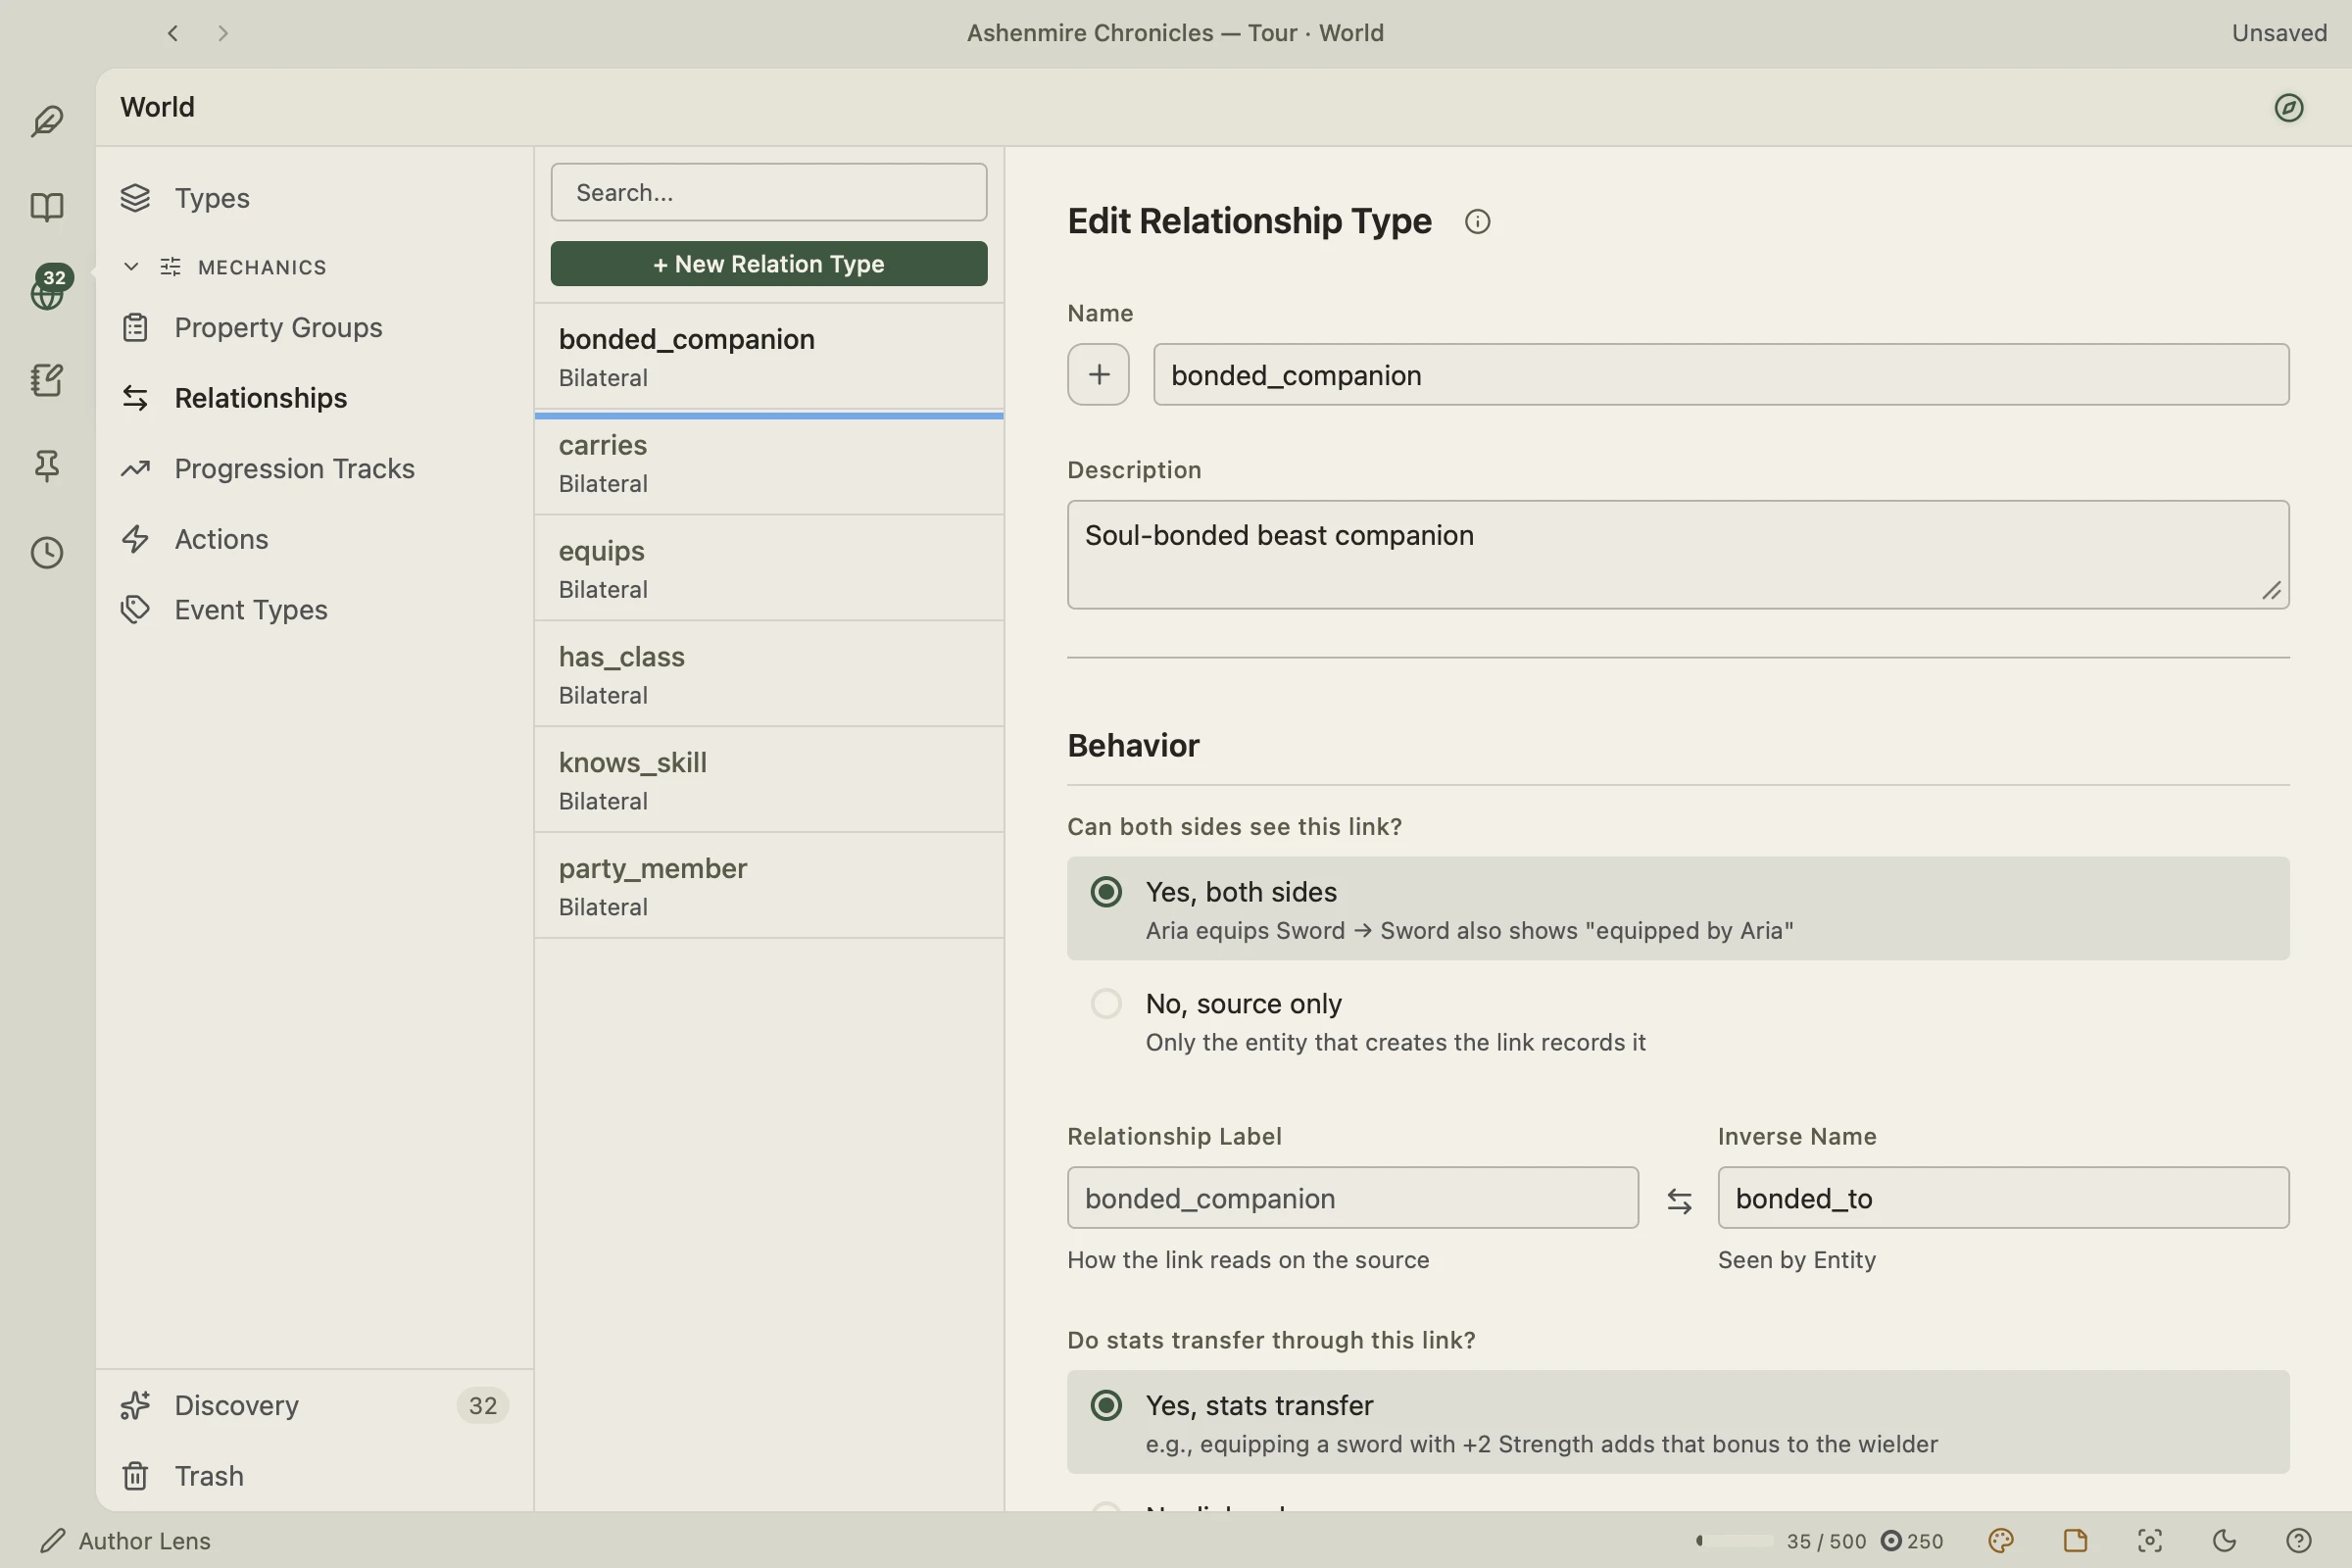
A relationship links two entities together with defined behavior: which direction it reads, whether stats flow through it, and what it’s called on each side. Equipping a sword, allying two factions, a character knowing another, a spell fused from two component spells: these are all relationships. The mechanism is generic. You define what it means for your world.
There are two layers: a relation type is the rule, defined once in the Universe (e.g. “Rivals”, “Equips”, “Fuses Into”). A relation is an instance of that rule linking two specific entities (e.g. Kira Shadowstep rivals Borin Ashfall). New projects ship with a handful of starter types you can use as-is or delete: equips, member_of, allied_with, rivals, knows, and parent_of.
Creating a relation type
Open Universe → Relationships → + New Relation Type
Choose the direction
Decide whether stats transfer
Optionally constrain source and target types
Optionally customize the action labels
Linking two entities
Open the source entity's sheet
Click + Add Relation
Check the other side, for bilateral types
Remove a relation from either side
The Event Ledger
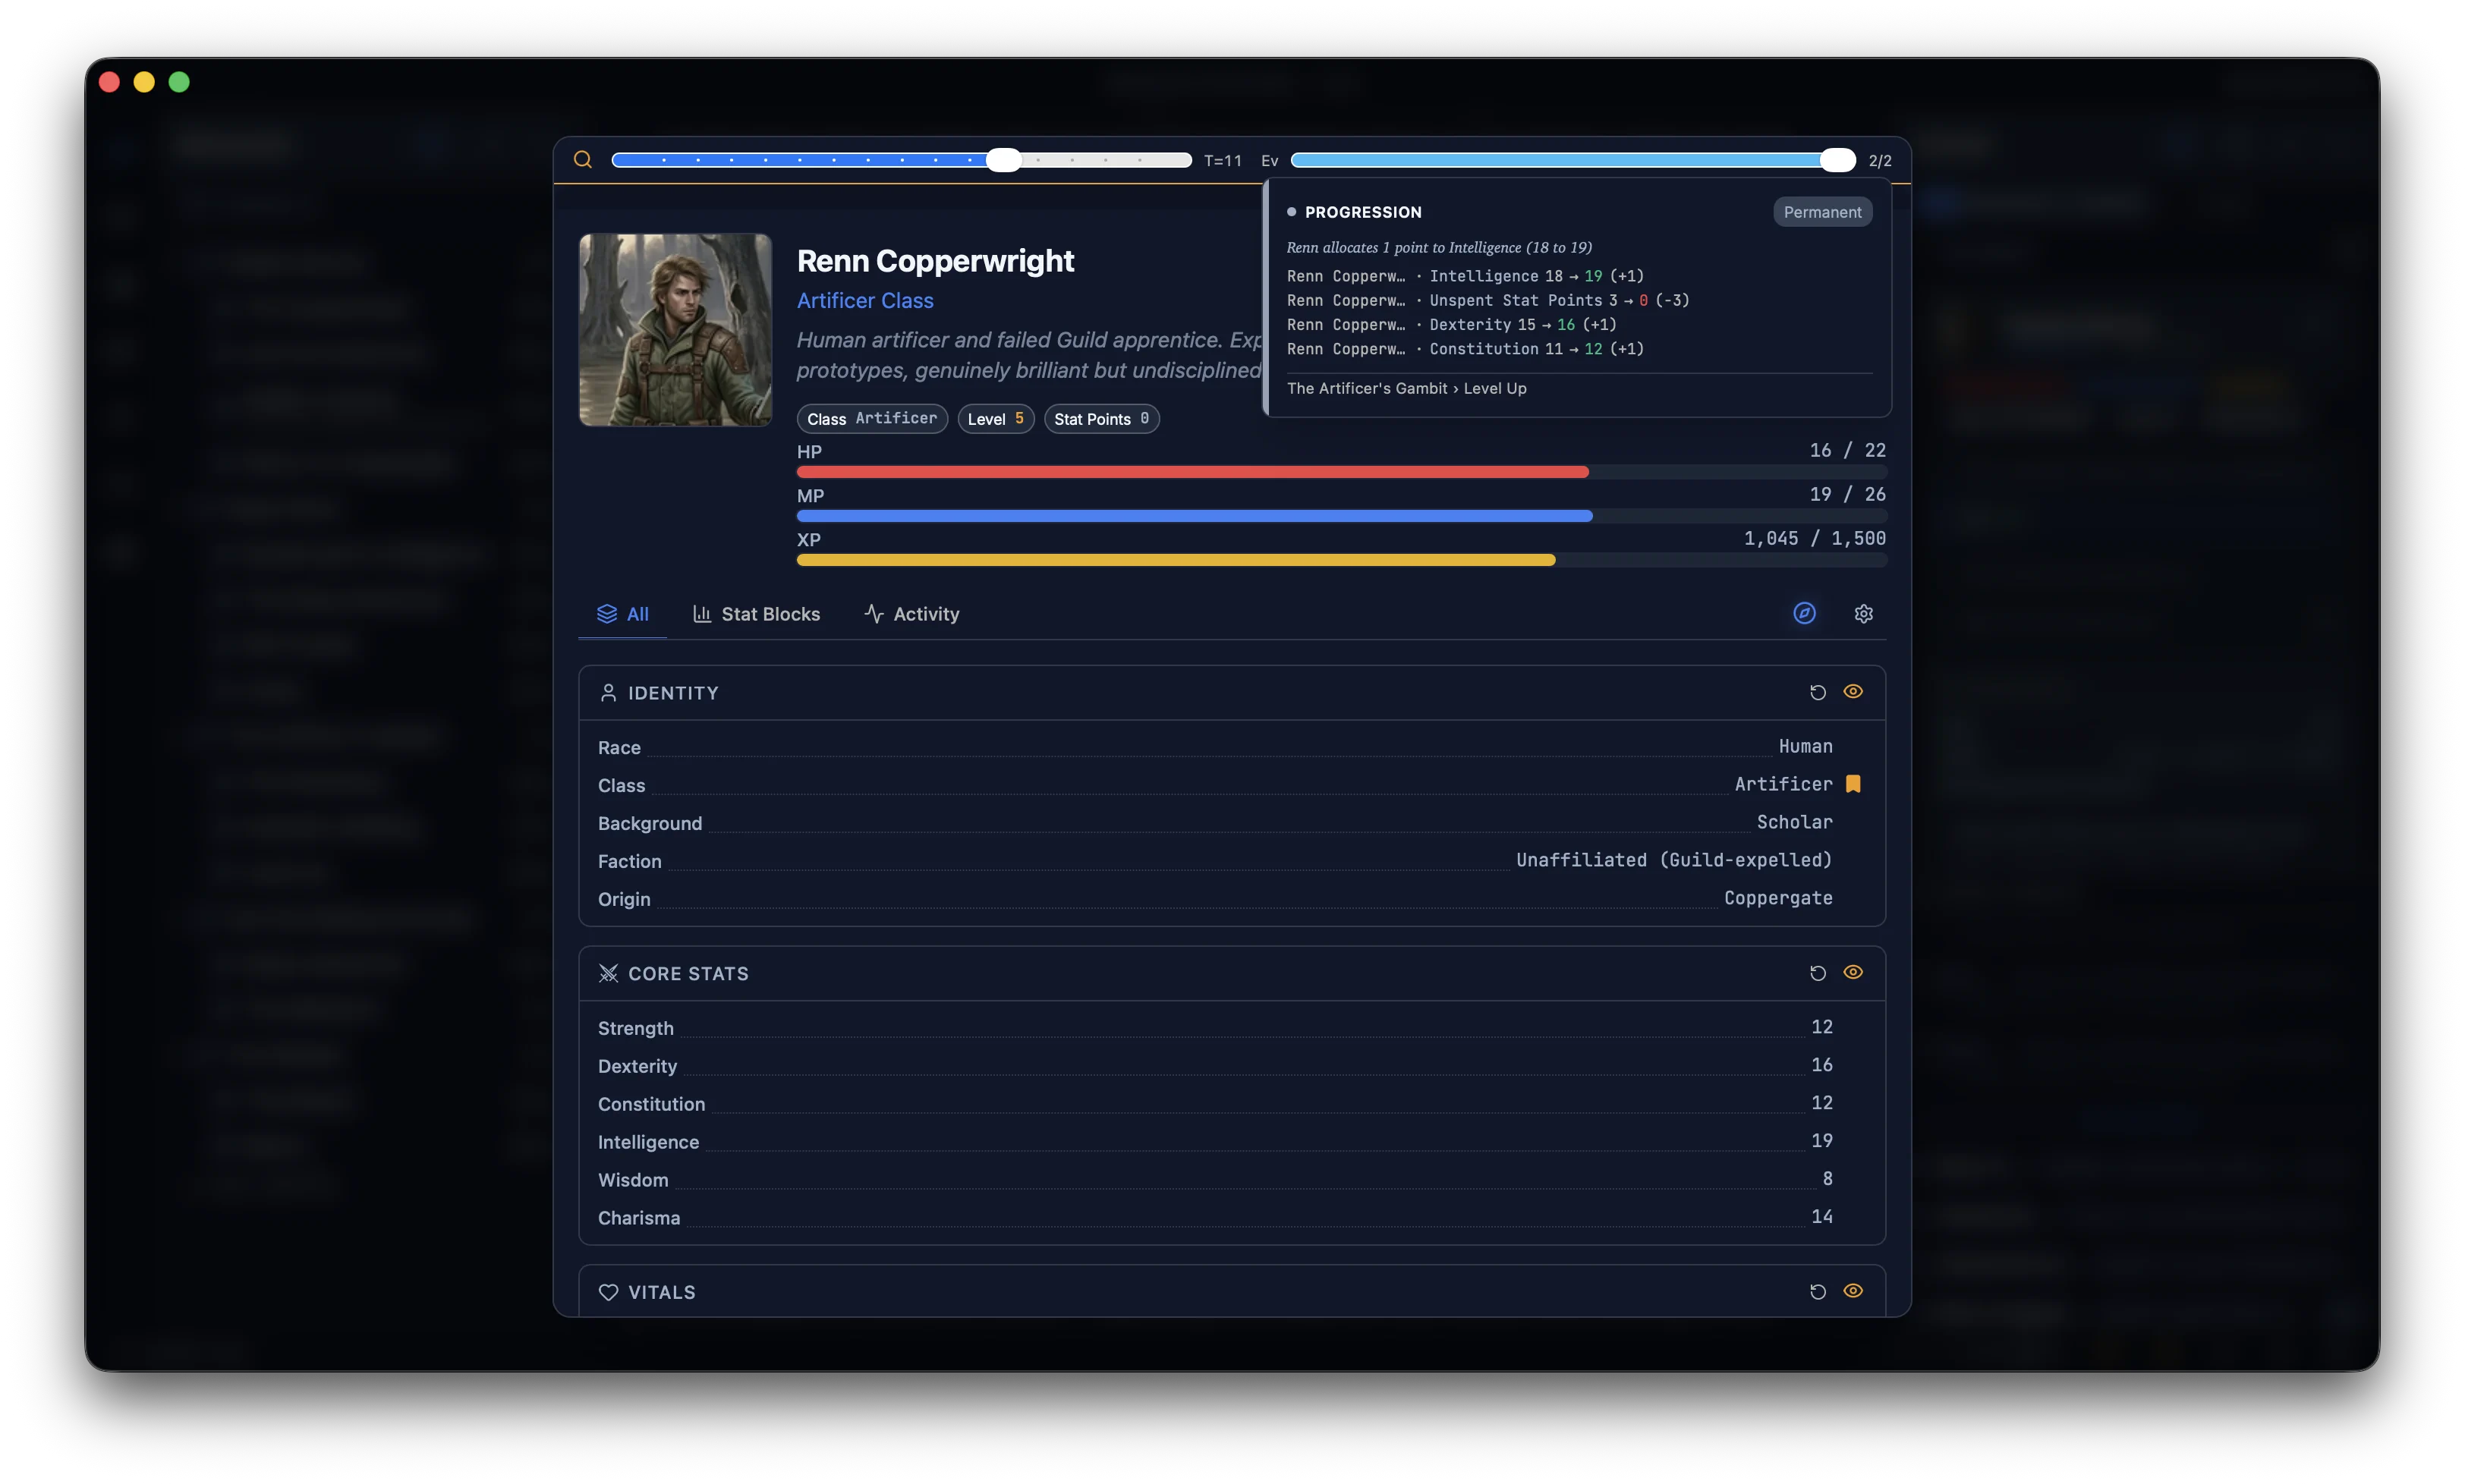
The event ledger is the heart of Understory. It is a sequenced set of deltas: discrete records of every change to your story world, each with a position in the timeline. Entity property values are never stored directly. The current state of any entity is always computed by replaying the relevant ledger events in sequence order.
This means every change is auditable. Hover any stat on an entity sheet and the tooltip shows every source: base value, equipment grants, level-up bonuses, active effects. Every modifier, traced.
Recording an event
Four ways to open the event recorder:
- –Hover over any underlined entity name in prose → Create Event
- –Click the + circle that appears on the left of any paragraph on hover
- –Type /event anywhere in the editor
- –Click + Add event between two existing events in the Timeline view
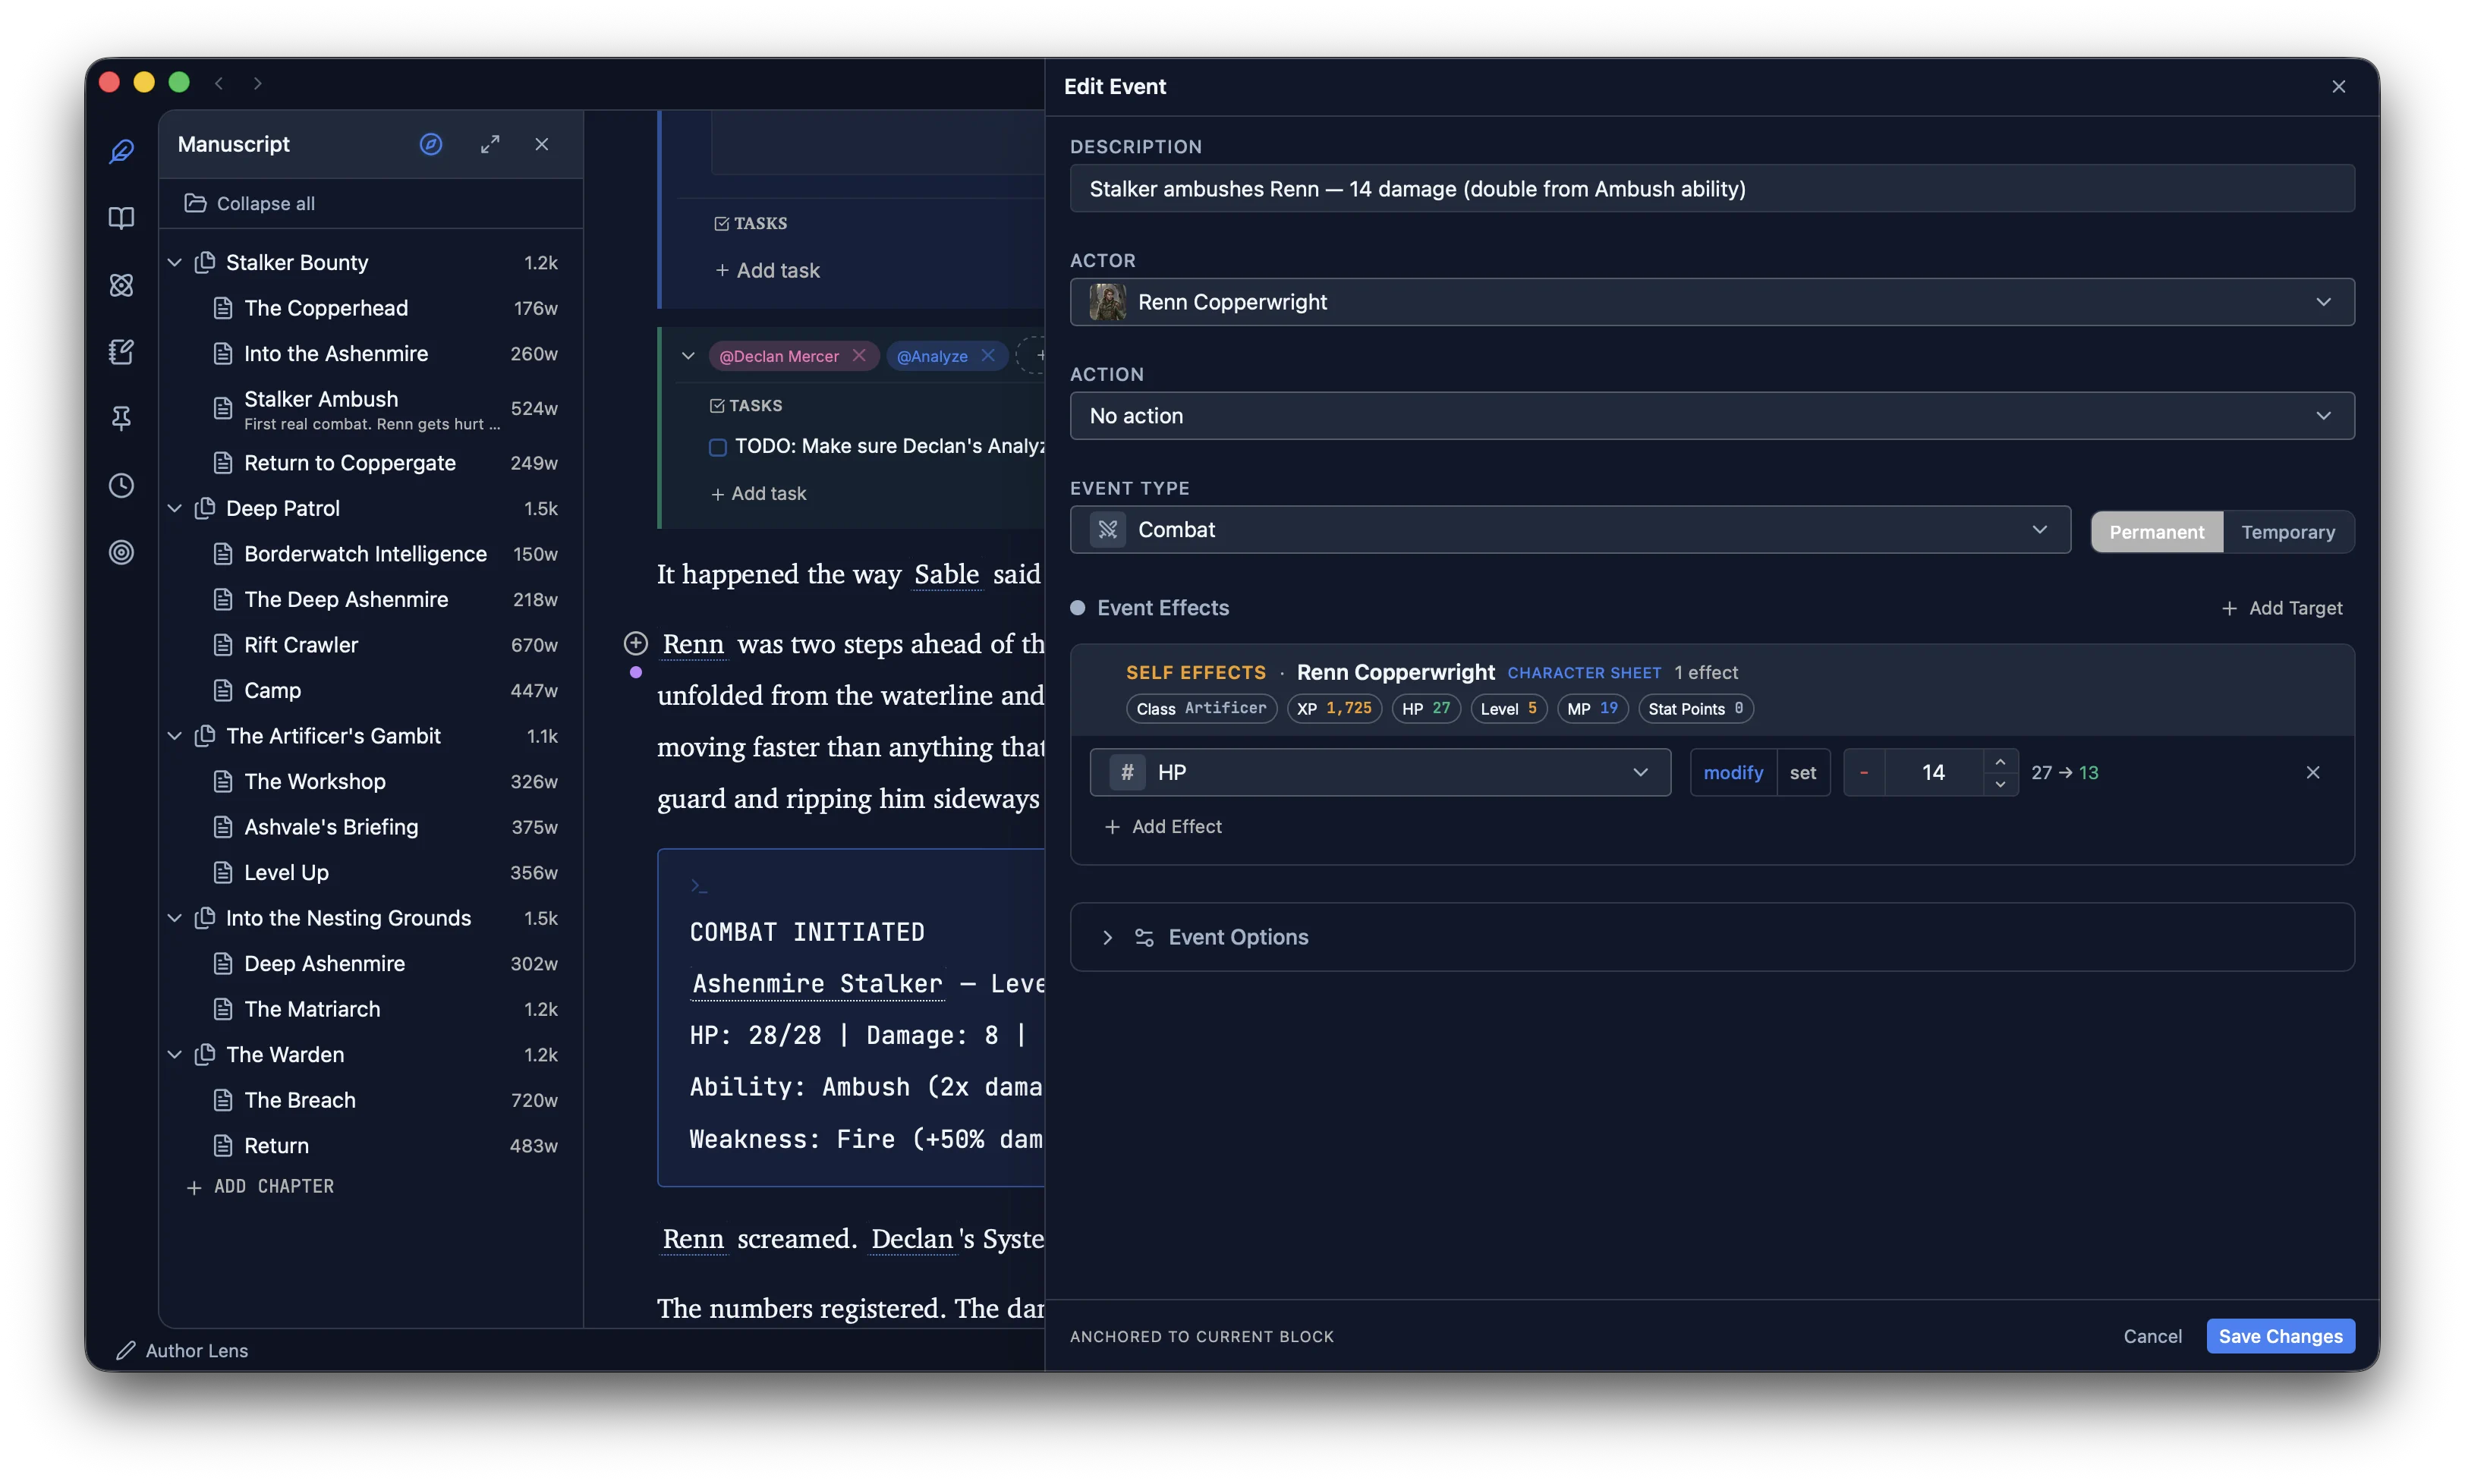
In the event editor, set a description, choose the actor, pick an event type (for color/icon coding in the Timeline), and add effects (one or more property changes on one or more target entities). Each effect shows a live before/after preview before you save.
Permanent vs. temporary
Permanent effects persist indefinitely. Temporary effects are time-limited and tracked as active modifiers, visible in the hover card and Context Panel until explicitly cleared by another event.
World-Time
Every event in the ledger carries two time coordinates:
seq_order (World time)
The in-world chronological position. For a time-loop story, this resets when the world resets.
sub_order (Subjective time)
The entity’s personal timeline. Always increments, never resets. A character who retains XP across loop resets accumulates sub_order higher than the reset point. The engine tracks their accumulated state correctly.
This is what makes flashbacks work correctly. Write a scene set three years before your current arc. Entity hover cards show their state at that world-time, not their current level. Add an event in the flashback that changes a stat, and downstream scenes where that change matters get flagged automatically.
Feature Reference
Draft
Draft is the main writing surface in Understory. It is a full-featured prose editor built on ProseMirror, with your manuscript structure in a collapsible left panel and the world model always within reach. No view switching required.
Manuscript structure
Your manuscript is organised as Arc → Chapter → Scene. The left panel shows the full tree; scenes are the primary writing unit. Drag and drop to reorder chapters or scenes within an arc. Right-click any node for rename, duplicate, move, and delete options. The panel collapses to give more writing room. The keyboard shortcut also works in Focus Mode.
Block types
Every paragraph is a block. Switch type with the block picker in the Editor Toolbar (appears on text selection) or with slash commands. Available types:
Focus Mode
Focus Mode is a distraction-free writing environment. Toggle with ⌘. or View menu → Focus Mode. It activates two behaviours simultaneously:
Paragraph dimming
All paragraphs except the one your cursor is in fade to low opacity. As you move between paragraphs, the active one sharpens and the rest dim. Keeps your attention on the sentence you are writing, not the one you already wrote.
Typewriter scrolling
The cursor line is pinned to the vertical centre of the screen. The page scrolls as you type so your insertion point never drifts to the bottom. Eliminates the constant head-tilt of bottom-of-screen writing.
The Context Panel, status bar, and scene tree remain accessible in Focus Mode. Press Esc or toggle the shortcut again to exit.
Synopsis & scene outlining
Type /synopsis at the start of a scene to insert a synopsis block. A framework picker appears. Choose one and the block renders a structured question form for that framework. Fill it in before you write, or after; it stays attached to the scene.
Available frameworks:
Freeform
Single text field, no structure. Write whatever is useful for this scene.
Scene & Sequel
Dwight Swain framework. Action sub-type: Goal → Conflict → Outcome. Reaction sub-type: Reaction → Dilemma → Decision. Toggle between the two within the same block.
Scene Purpose
What Happens → Why It Matters → What Changes. Accessible scene analysis, the simplest structured option after Freeform.
Story Grid
Shawn Coyne framework. Value Shift (Life → Death, Freedom → Captivity), Turning Point (the moment that shifts the value), Polarity (positive, negative, or ironic).
Emotional Arc
Opening State → Catalyst → Closing State. Tracks the character's emotional journey through the scene independent of plot.
Try-Fail Cycle
Attempt → Obstacle → Result → New Complication. Iterative tension structure for scenes built around escalating pressure.
Five W's
Who, What, Where, When, Why. Minimal scaffold, useful for quick orientation beats or scenes that don't need deeper analysis.
Synopsis blocks are invisible in manuscript exports. They surface in the Journal view organised by chapter so you can review your scene-level plan in one place.
Notes, todos & inline comments
Inline annotations are inserted with slash commands and stay anchored to the paragraph where they are written. They are invisible in exports. All annotations surface in the Journal view aggregated by chapter.
/noteGeneral author note. Use for research reminders, worldbuilding observations, or anything that isn't a task./todoAn actionable task. Shows in the Journal with a checkbox so you can mark it done without leaving the view./todo-continuityA continuity check flagged for later. Useful when you know something needs cross-referencing but don't want to break flow now./todo-expandA placeholder for a section you intend to write out further. Marks the spot without leaving a gap in the prose./commentAn inline markup comment attached to a text selection. Equivalent to a Word margin comment. Tagged text gets a subtle highlight.Tag entities in any annotation with @EntityName. The annotation surfaces on that entity’s Activity tab alongside the entity’s event history.
Slash commands reference
Type / anywhere in the editor to open the command palette. Common commands:
/eventOpen the event editor anchored to this paragraph/synopsisInsert a scene synopsis block with framework picker/noteInsert an inline author note/todoInsert an actionable task reminder/todo-continuityFlag a continuity check for later/todo-expandMark a section for future expansion/commentAttach an inline markup comment to selected text/sprintStart a writing sprint with a timer and word goal/h1, /h2, /h3Insert a heading block/quoteInsert a block quote/statInsert a Stat Block: a collapsible stat display linked to an entity, with its own view selector/systemInsert a system message blockLexicon
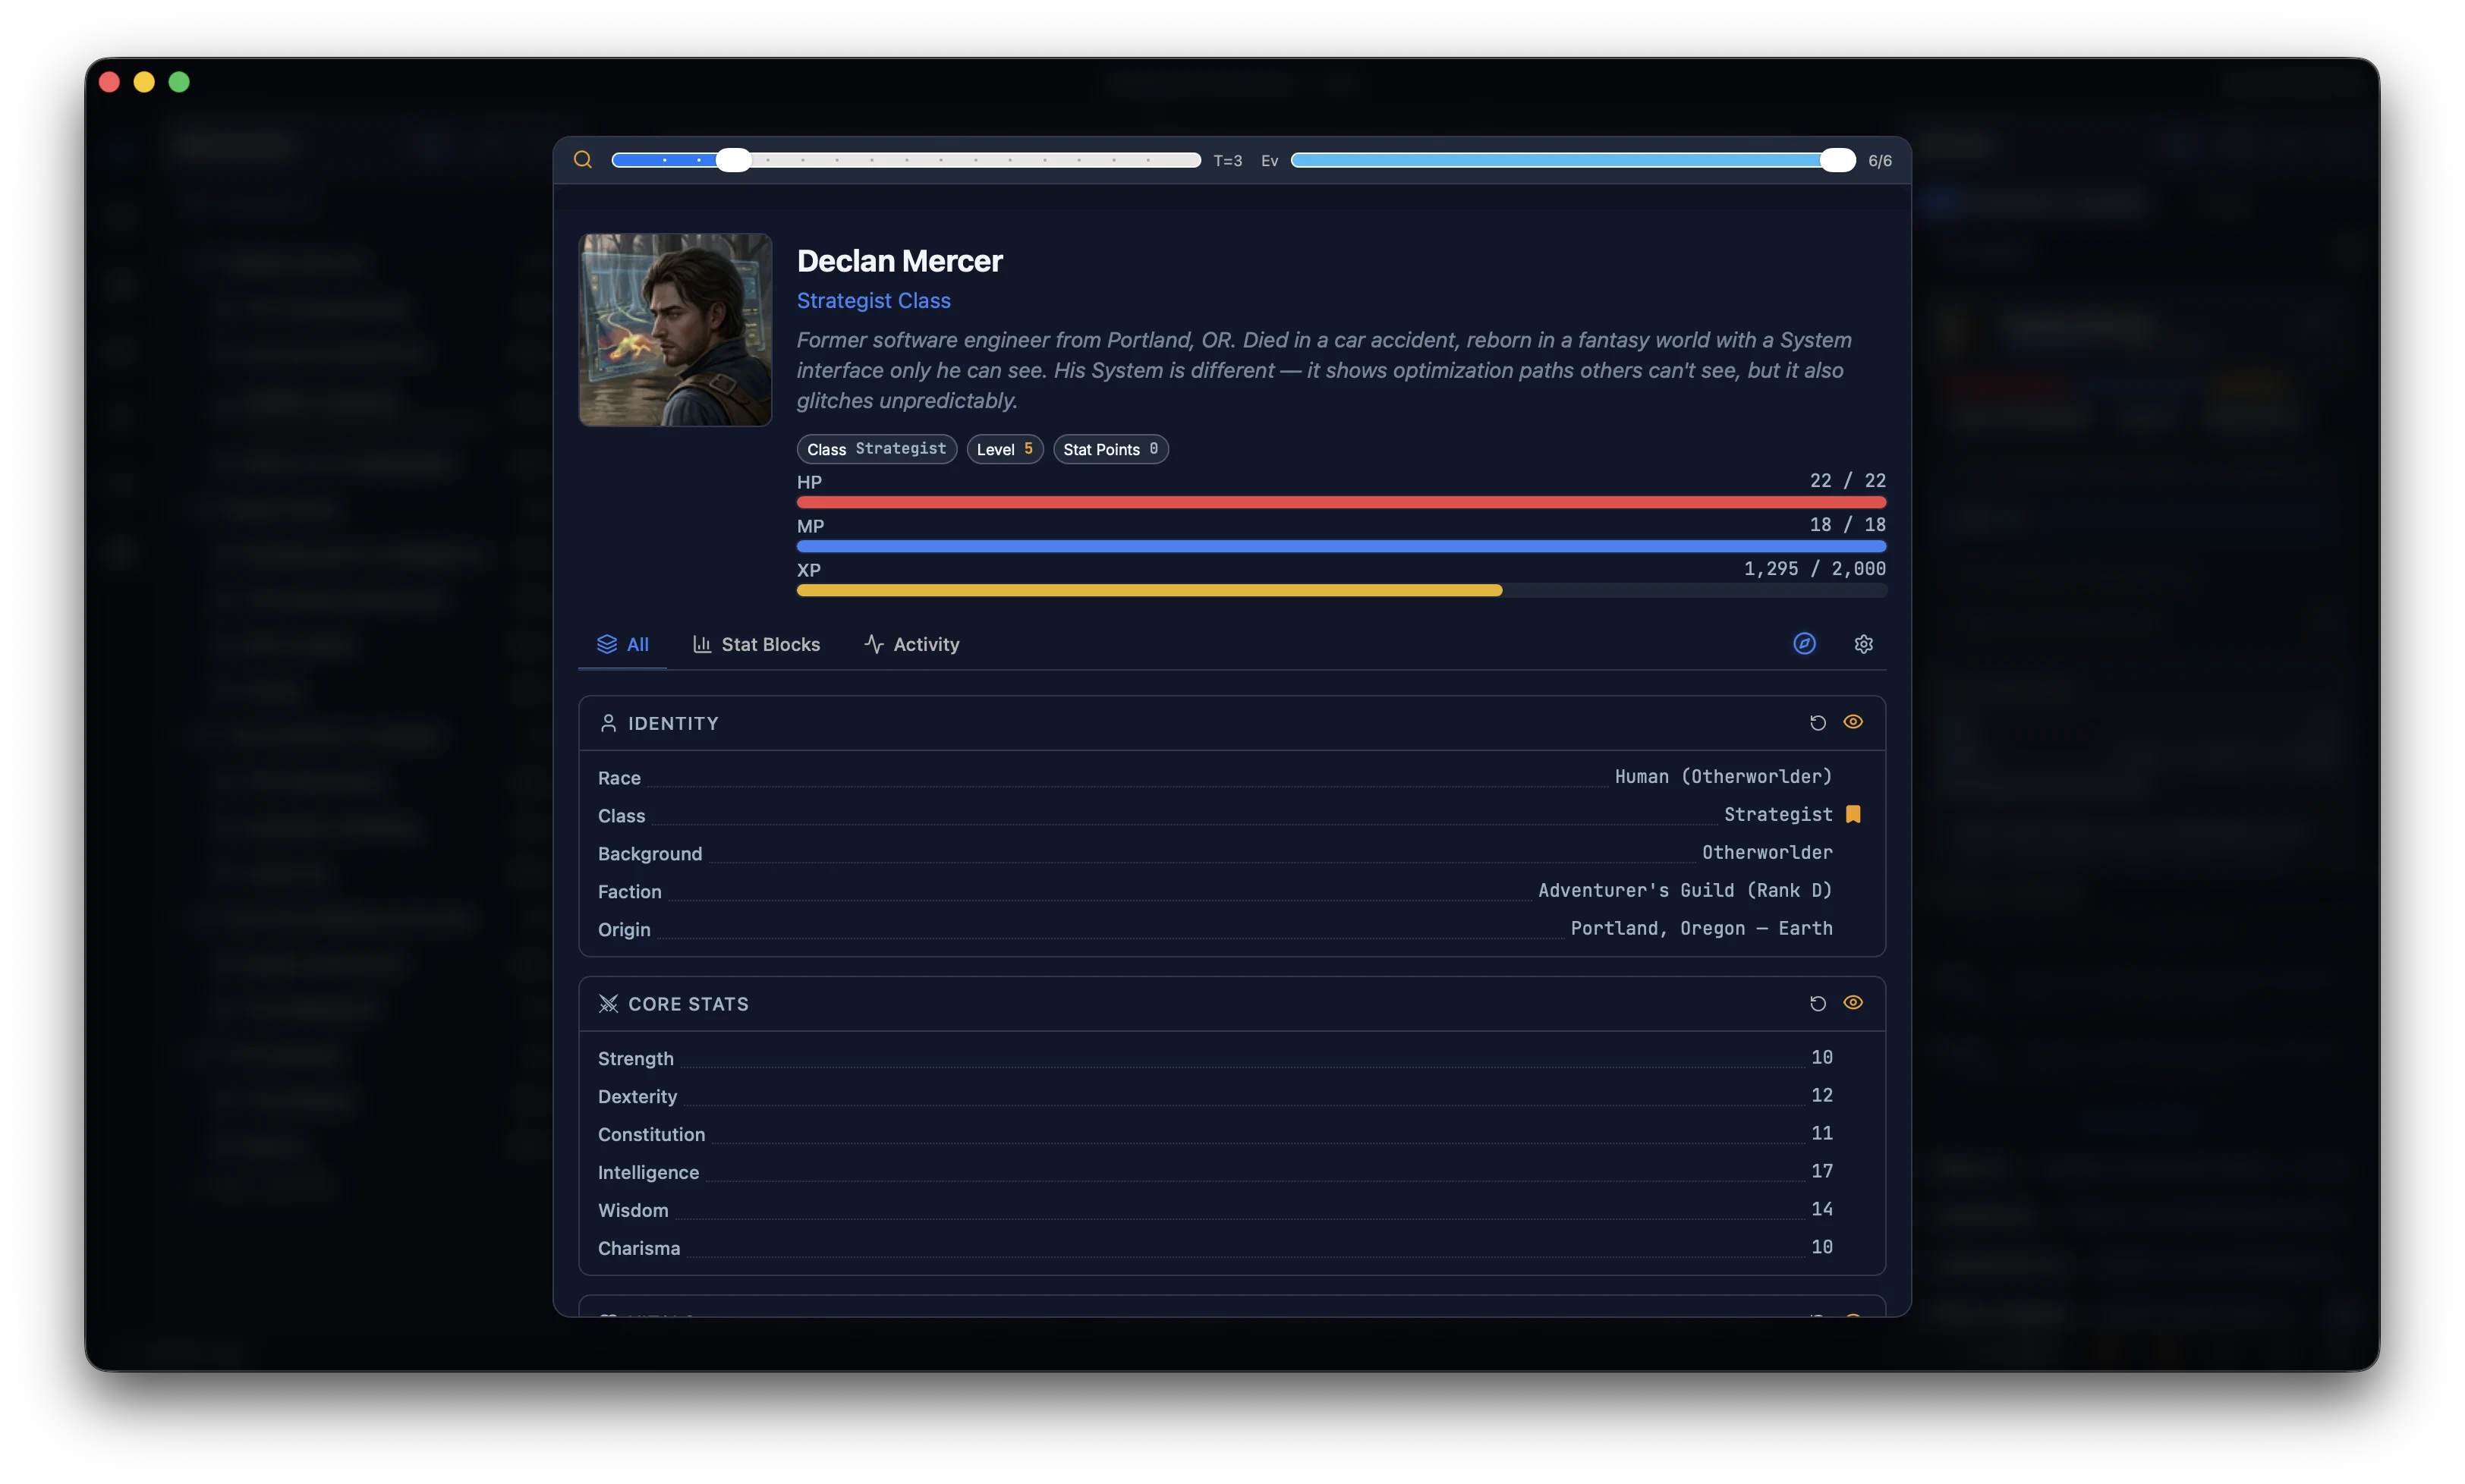
The Lexicon is the browsable catalog of all entities in the project. Entities are grouped by template type (Character, Monster, Location, etc.) and displayed as cards with a portrait, name, and two activity indicators: manuscript mention count and event count. Two view modes: Cards and Table.
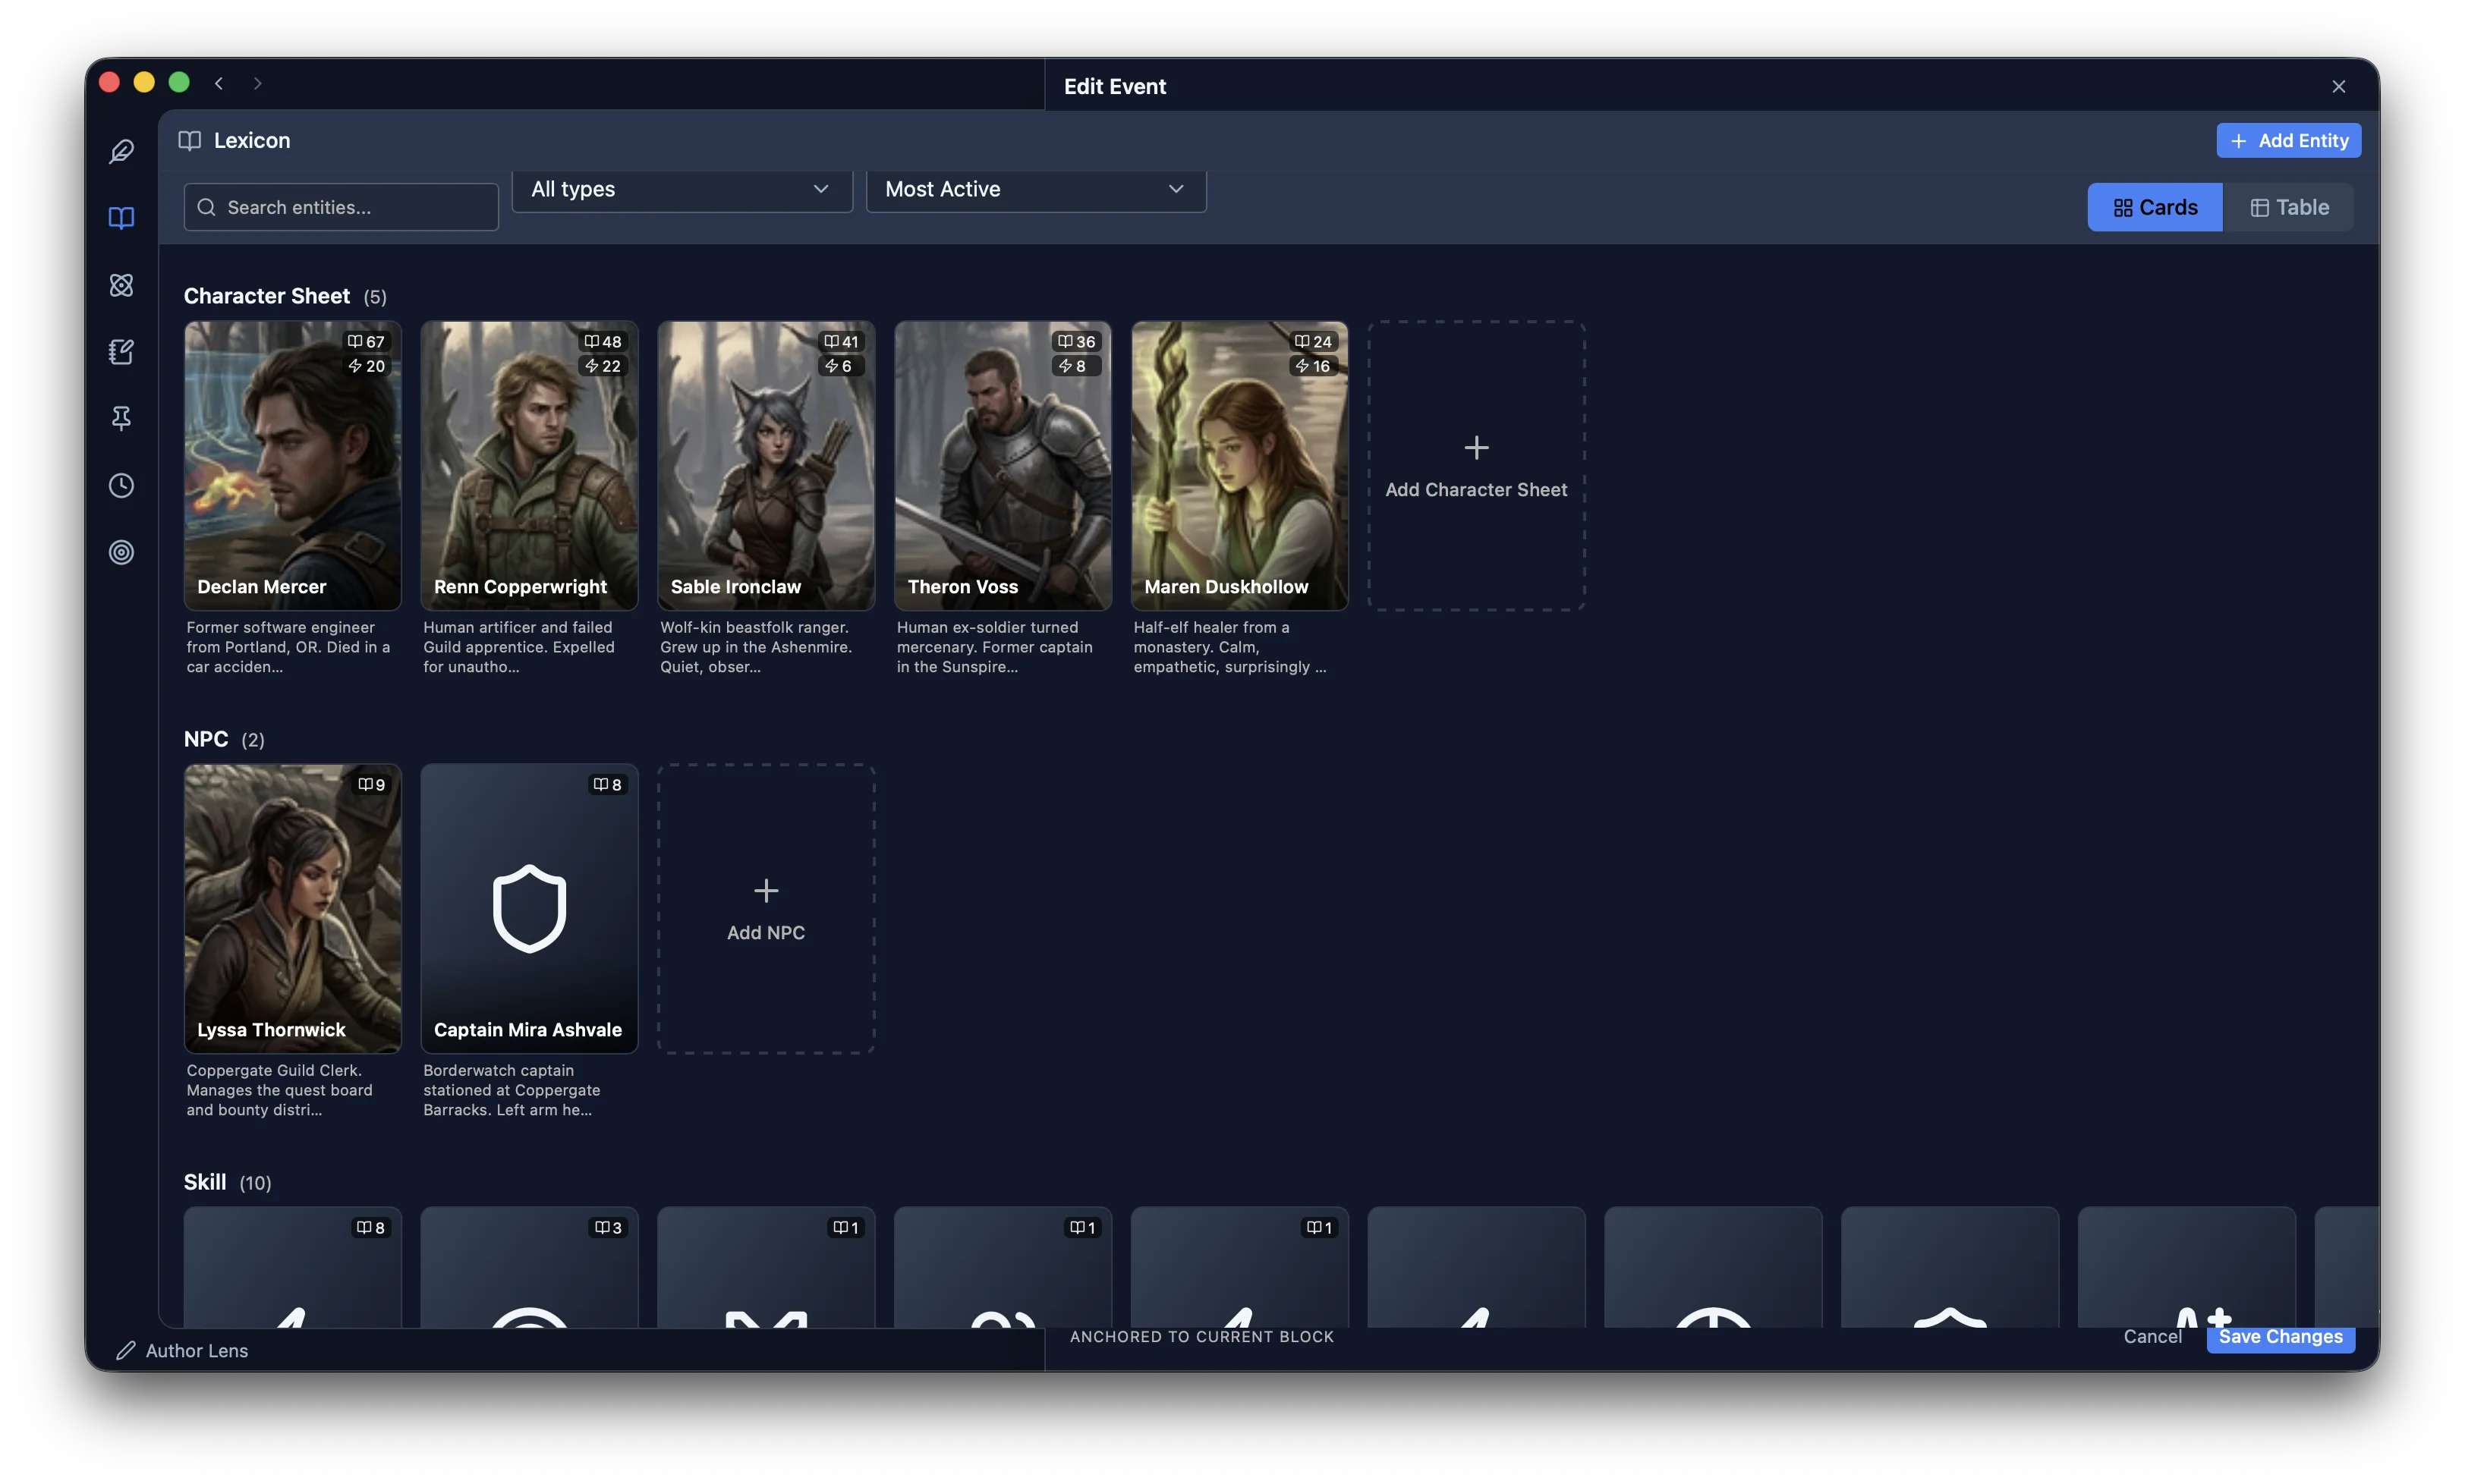
Clicking a card opens the entity sheet, the full detail view. The entity sheet shows all property groups, a timeline scrubber that lets you see the entity’s state at any point in its history, and three tabs: All (every property group), Stat Blocks (custom display templates), and Activity (manuscript mentions, author notes, and recorded events for this entity).
Discovery
The Discovery panel (inside the Lexicon) scans the manuscript for potential entity candidates (named things that appear repeatedly). Each candidate shows a confidence score, mention count, and suggested type. You review and select which to create. Nothing is added automatically. Useful for authors importing an existing manuscript who need to build out their Lexicon from existing prose.
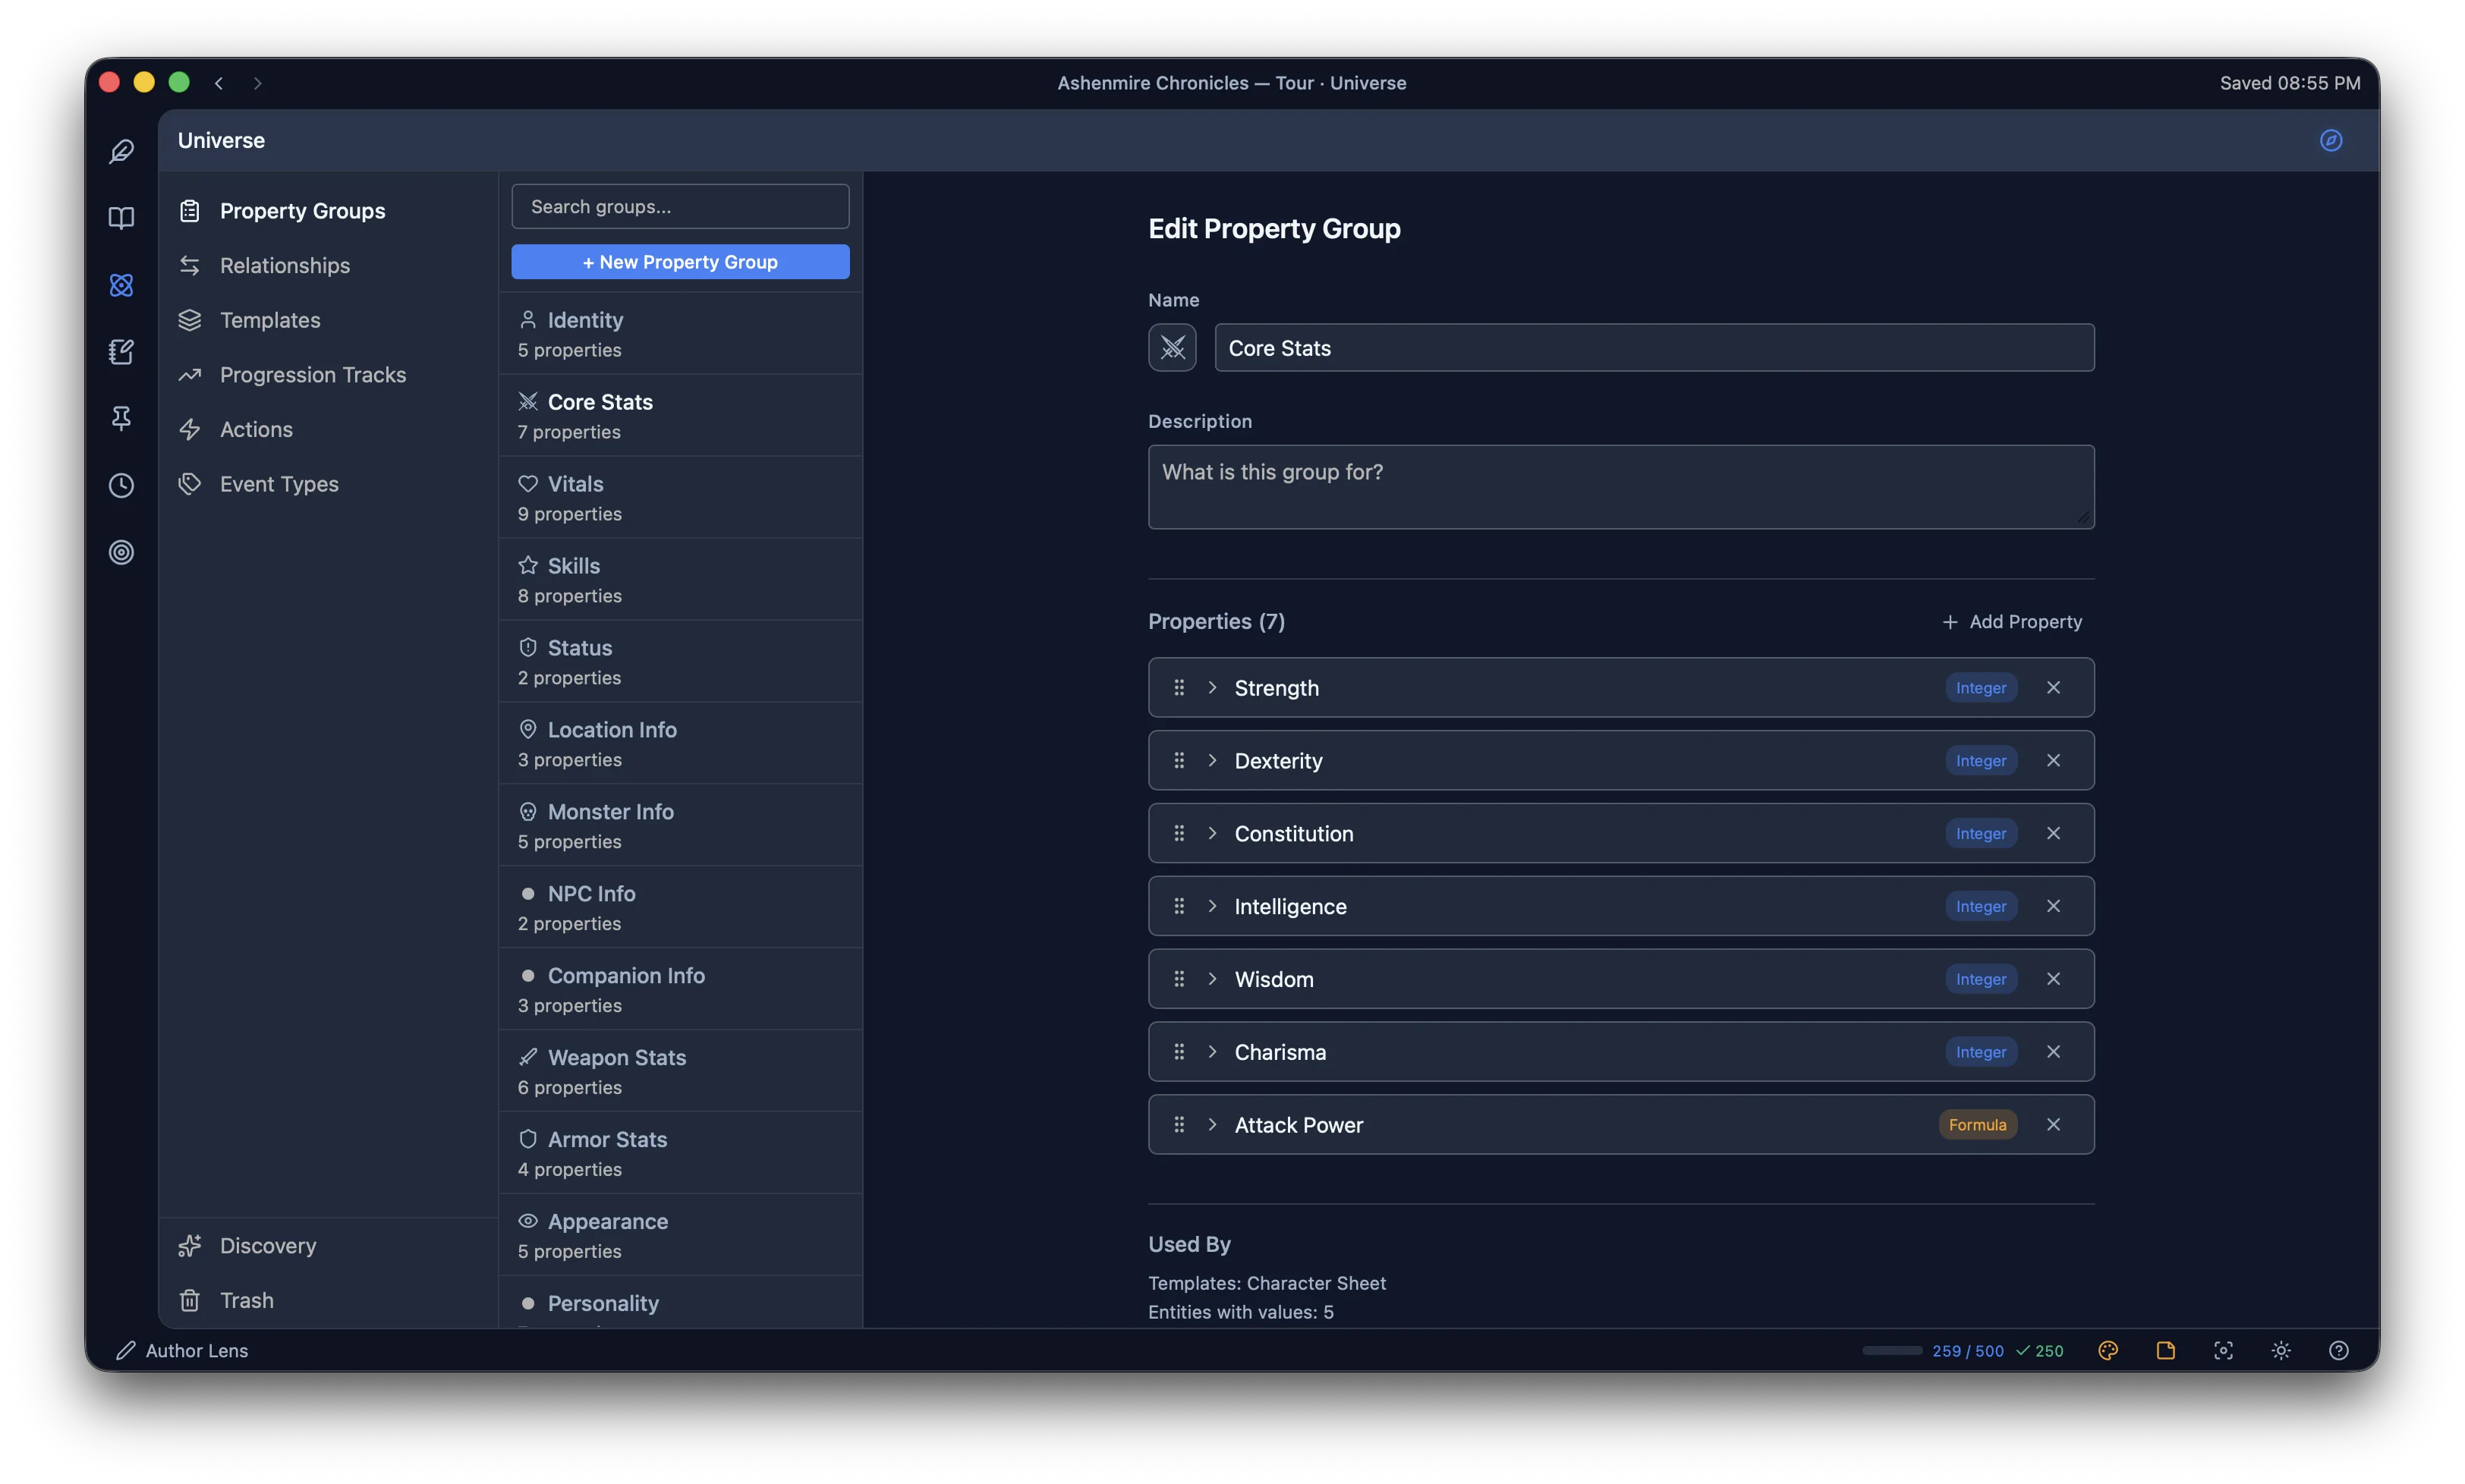
Universe
The Universe is where you define the rules of your world. It contains your templates, property groups, relationship types, progression tracks, event types, and actions. New projects start with a blank Universe containing only the system, a stub entity intended as the actor for game-system events like level ups, loot drops, and skill grants.
The Universe sidebar organizes everything by type. Templates are the starting point for most world-building. Create a Character template before you can create a character entity.
Journal
The Journal is one panel with eight tabs, aggregating every author annotation written throughout the manuscript. Notes are not written from the Journal itself. They are written inline in the manuscript editor using / commands and surface here automatically, organized by chapter location.
Tabs
Eight tabs: All, Journal (freeform notes with no entity attached), Lexicon Notes (freeform notes attached to an entity), Notes, Synopses, TODOs, Markup, and Boards. Yes, one of the Journal’s own tabs is also called Journal: that’s the one for freeform notes with nothing linked to them. The Boards tab lists your Corkboard boards; opening one launches the board fullscreen. See Corkboard for what you can do once a board is open.
Scope
A two-way toggle above the list switches between All (every annotation in the project) and Chapter (only annotations in whichever chapter is currently open in the editor). Switching chapters in Draft updates the filtered list live.
Slash commands for annotations
/noteGeneral inline annotation/synopsisScene synopsis with framework picker (Scene/Sequel, Story Grid, Five Ws, and more)/todoActionable task reminder/todo-continuityContinuity check/todo-expandExpansion note
Tag entities in any annotation with @EntityName. The annotation then surfaces on that entity’s Activity tab, letting you see all planning notes about a character in one place.
Timeline
The Timeline is the master event log for the project: the full, ordered record of every state change across all entities, organized by arc, scene, and event. Each event entry shows its type badge (color-coded), description, and world-time position. Expanding an event shows every entity affected and the before/after delta for each changed property.
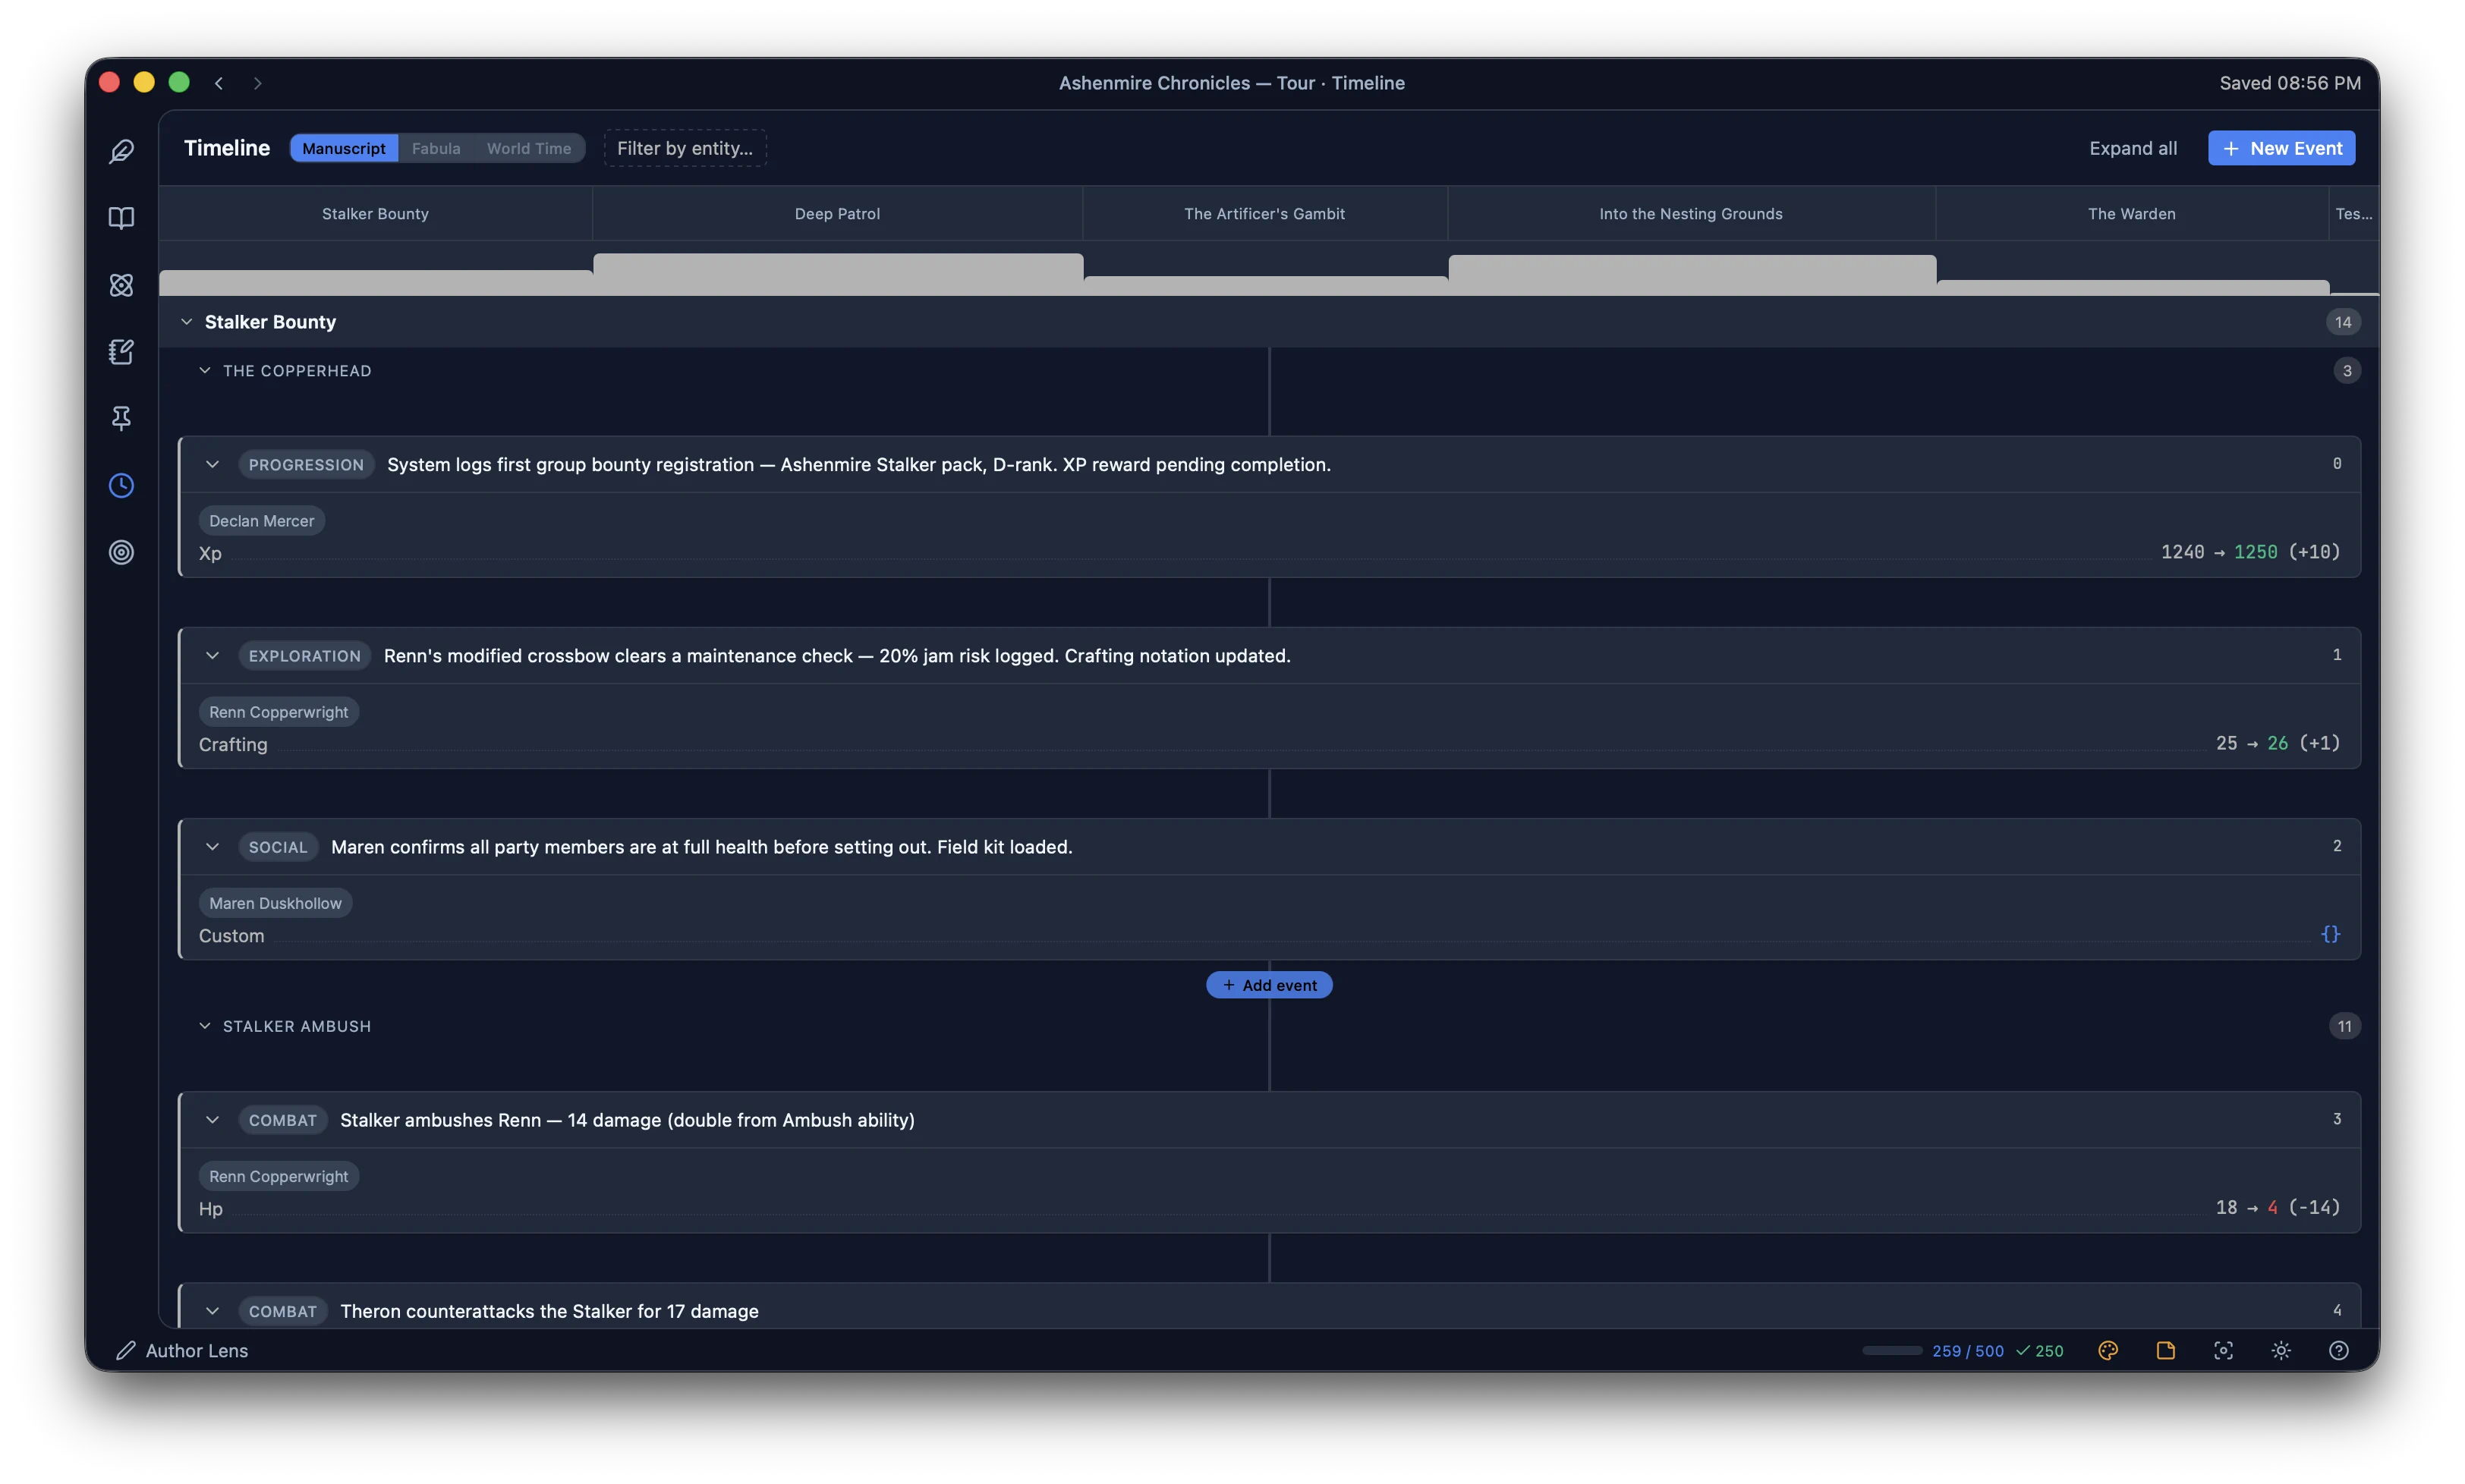
The top of the Timeline shows a horizontal arc overview. All arcs are displayed as column headers, giving a birds-eye sense of where events fall across the story.
Filter by entity to turn the full project log into a character-specific event history. Use “+ Add event” between any two existing events to insert an event at a specific world-time position.
Corkboard
Corkboard is a free-form visual planning canvas: sticky notes, text blocks, entity cards, event cards, scene cards, note cards (pinned Notes, Synopses, TODOs, or Markup comments), and a WorldTime node, connected with labeled edges. A project can hold multiple boards.
Corkboard has two doors in. Activity bar → Corkboard opens a hub: a grid of every board in the project, with its own create, rename, duplicate, and delete controls. The Journal’s Boards tab lists the same boards and opens one directly. There is no in-canvas board switcher; use the “← Boards” button in a board’s toolbar to return to the hub and pick a different one.
Create a board
Add a card
Connect two cards
Story Order
This is Understory’s flashback machinery, labeled in the app as Timeline (Story Order). Drag scenes into the order they happen in the world, independent of the order they appear in your manuscript. It’s a different surface from the Timeline view covered above (the master event log), and it sets the same seq_order world-time coordinate described in World-Time, at the scene level.
Drag a scene card by its handle and drop it where it belongs chronologically. Dropping rebuilds the world-time order for the whole list in one step. A scene whose world-time position doesn’t match where it sits in your manuscript gets a badge: flashback if it happens earlier than its neighbors read, flash-fwd if later. The panel header shows how many scenes have been ordered so far; anything without a position yet collapses into an Unordered group at the bottom.
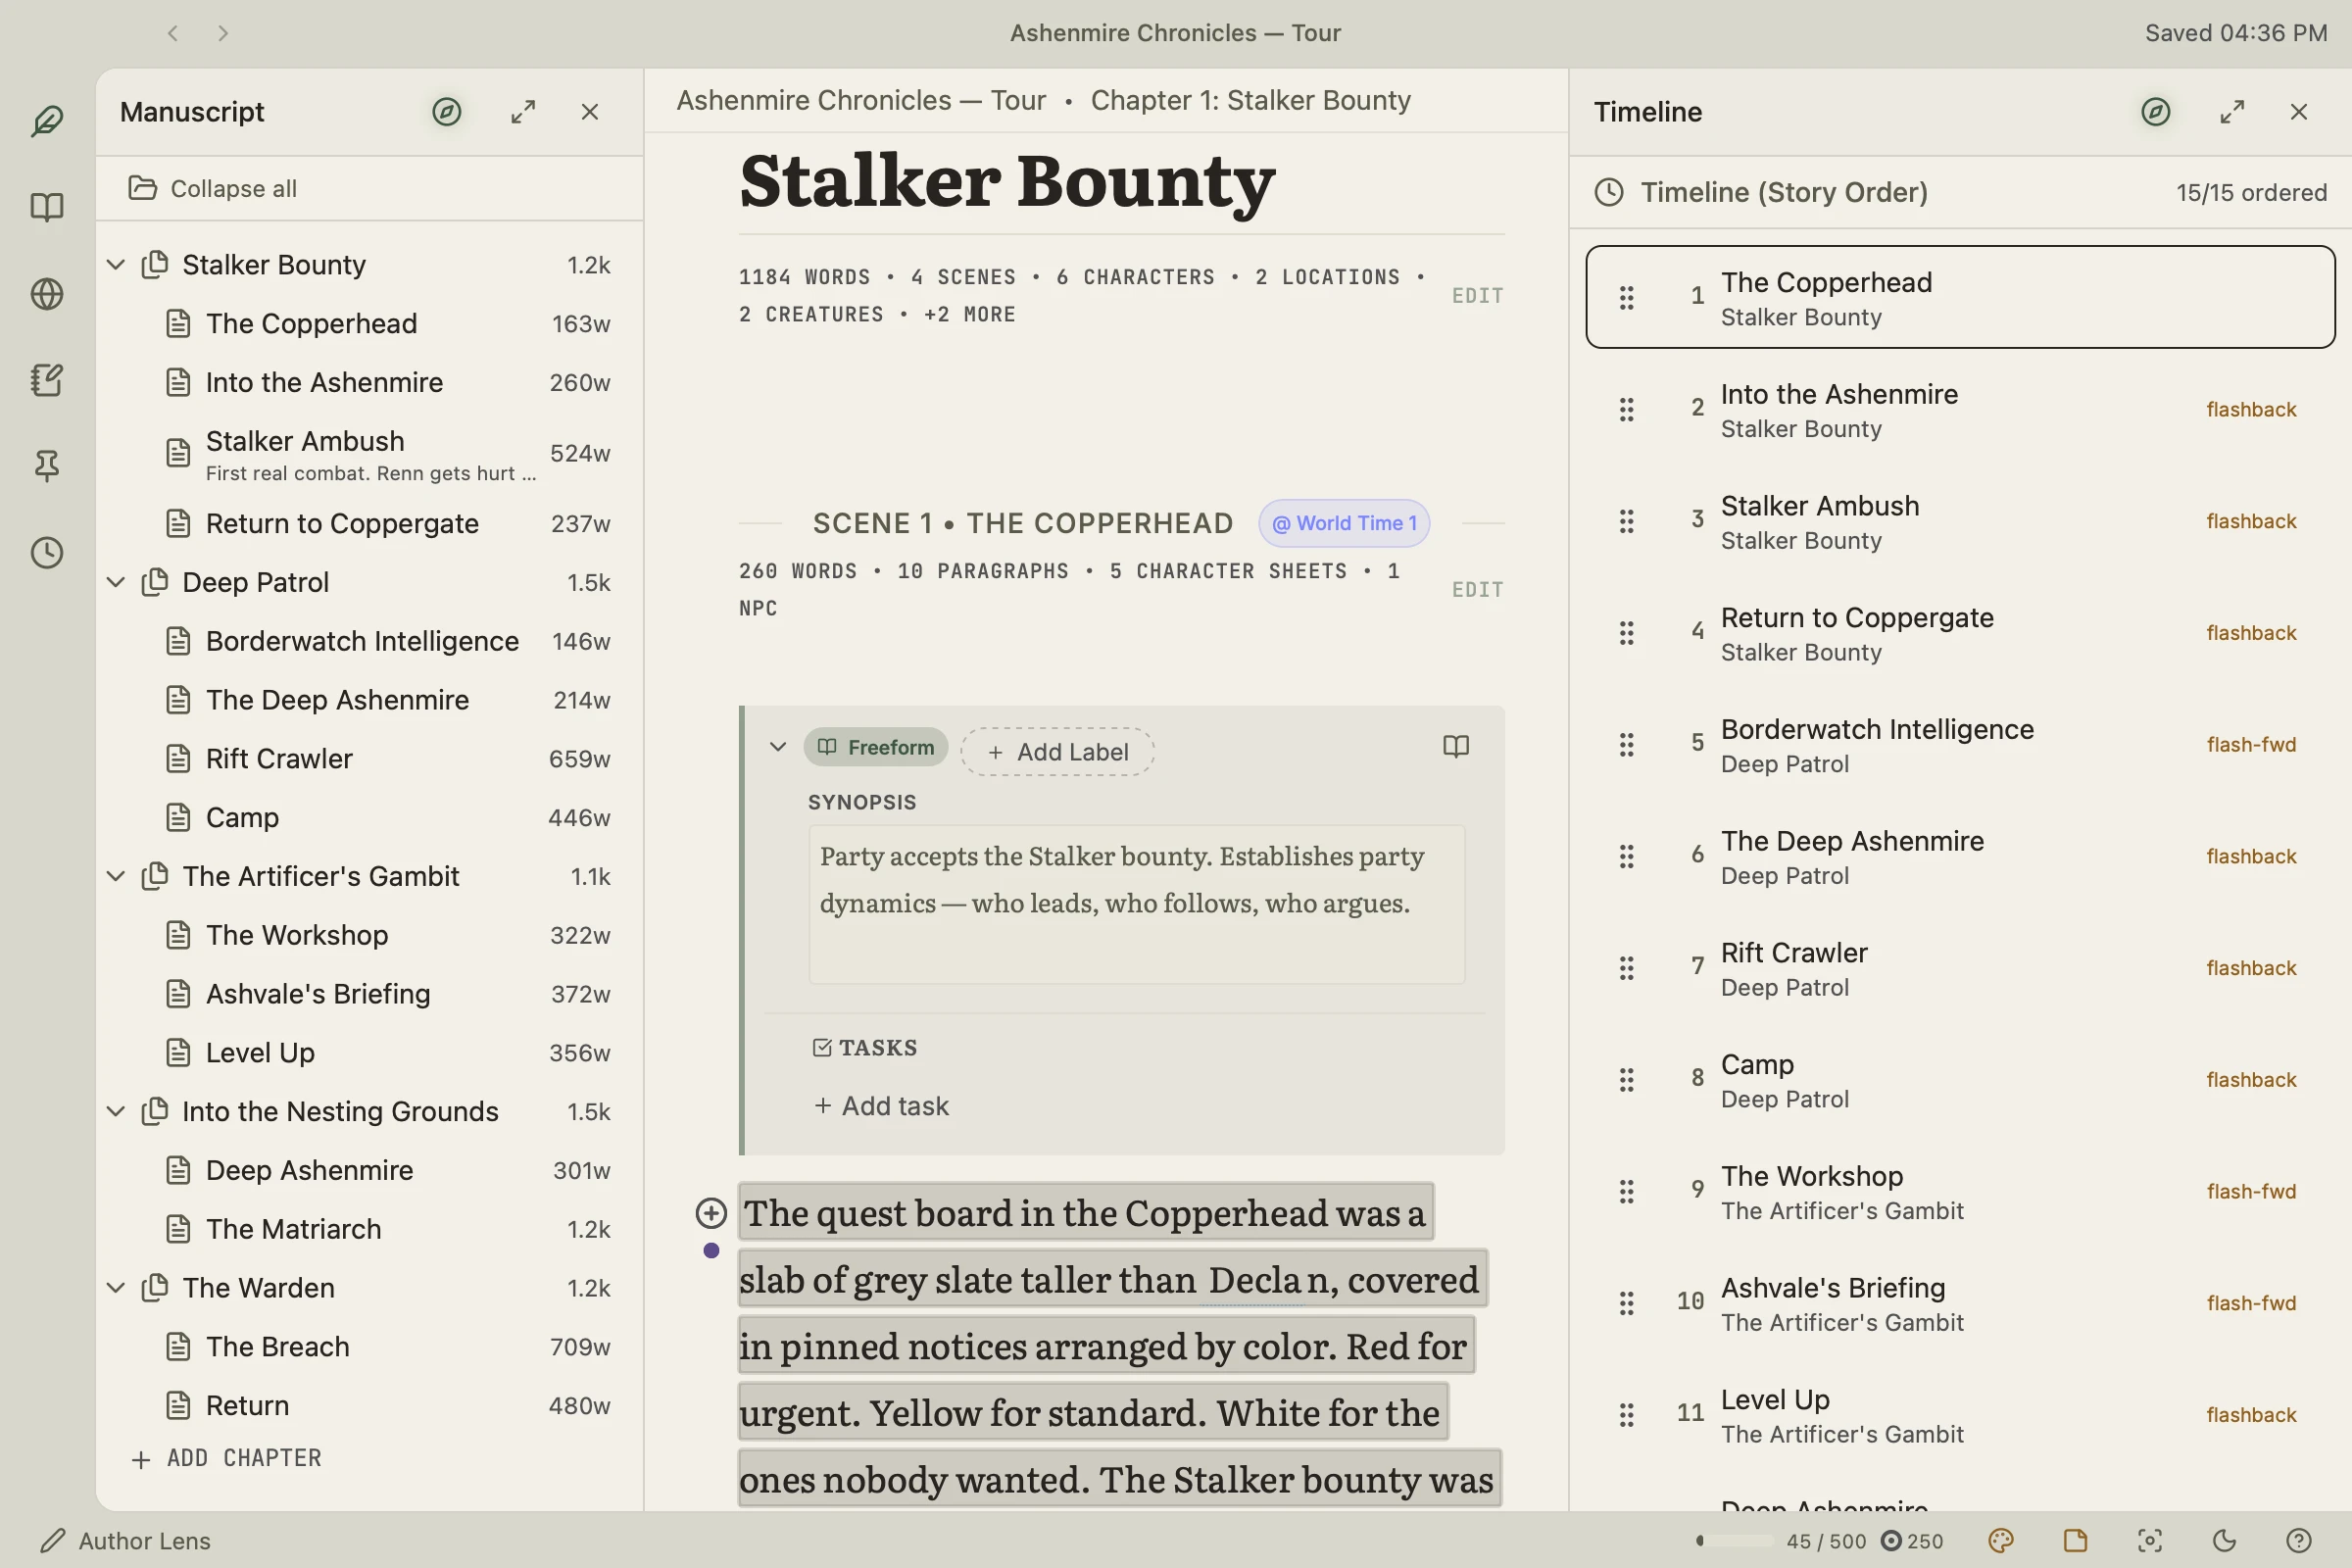
Temporal navigation on entity sheets
Entity sheets carry a related temporal strip. Hover it to preview the chapter, scene, synopsis, and other entities present at that world-time position. A magnifying-glass icon opens a search across chapters, scenes, and events. If you scrub away from where your writing cursor actually is, the strip changes color to flag that you’ve drifted from your current position, so you don’t mistake a historical view for the present.
Goals & Writing Sprints
The Goals view tracks session, daily, weekly, and project-level progress across four dimensions: words, entities added, events recorded, and planning notes created. Tracking entities and events alongside word count is intentional. A session spent building out your world model is productive authoring work even if the prose word count is zero.
The word count in the bottom status bar is a live clickable goal indicator. Clicking it opens a quick Goals popover without leaving the editor.
Writing sprints are launched from the /sprint slash command or the Goals popover. Set a duration (5–30 min) and an optional word goal. The status bar shows live words written, time remaining, and current WPM during an active sprint. Sprints do not lock the editor. Stop anytime.
Entity Creation Wizard
The entity creation wizard is the fastest path from “I need a character” to a fully structured entity with the right properties. It covers four archetypes out of the box: Character, Location, Item, and Creature.
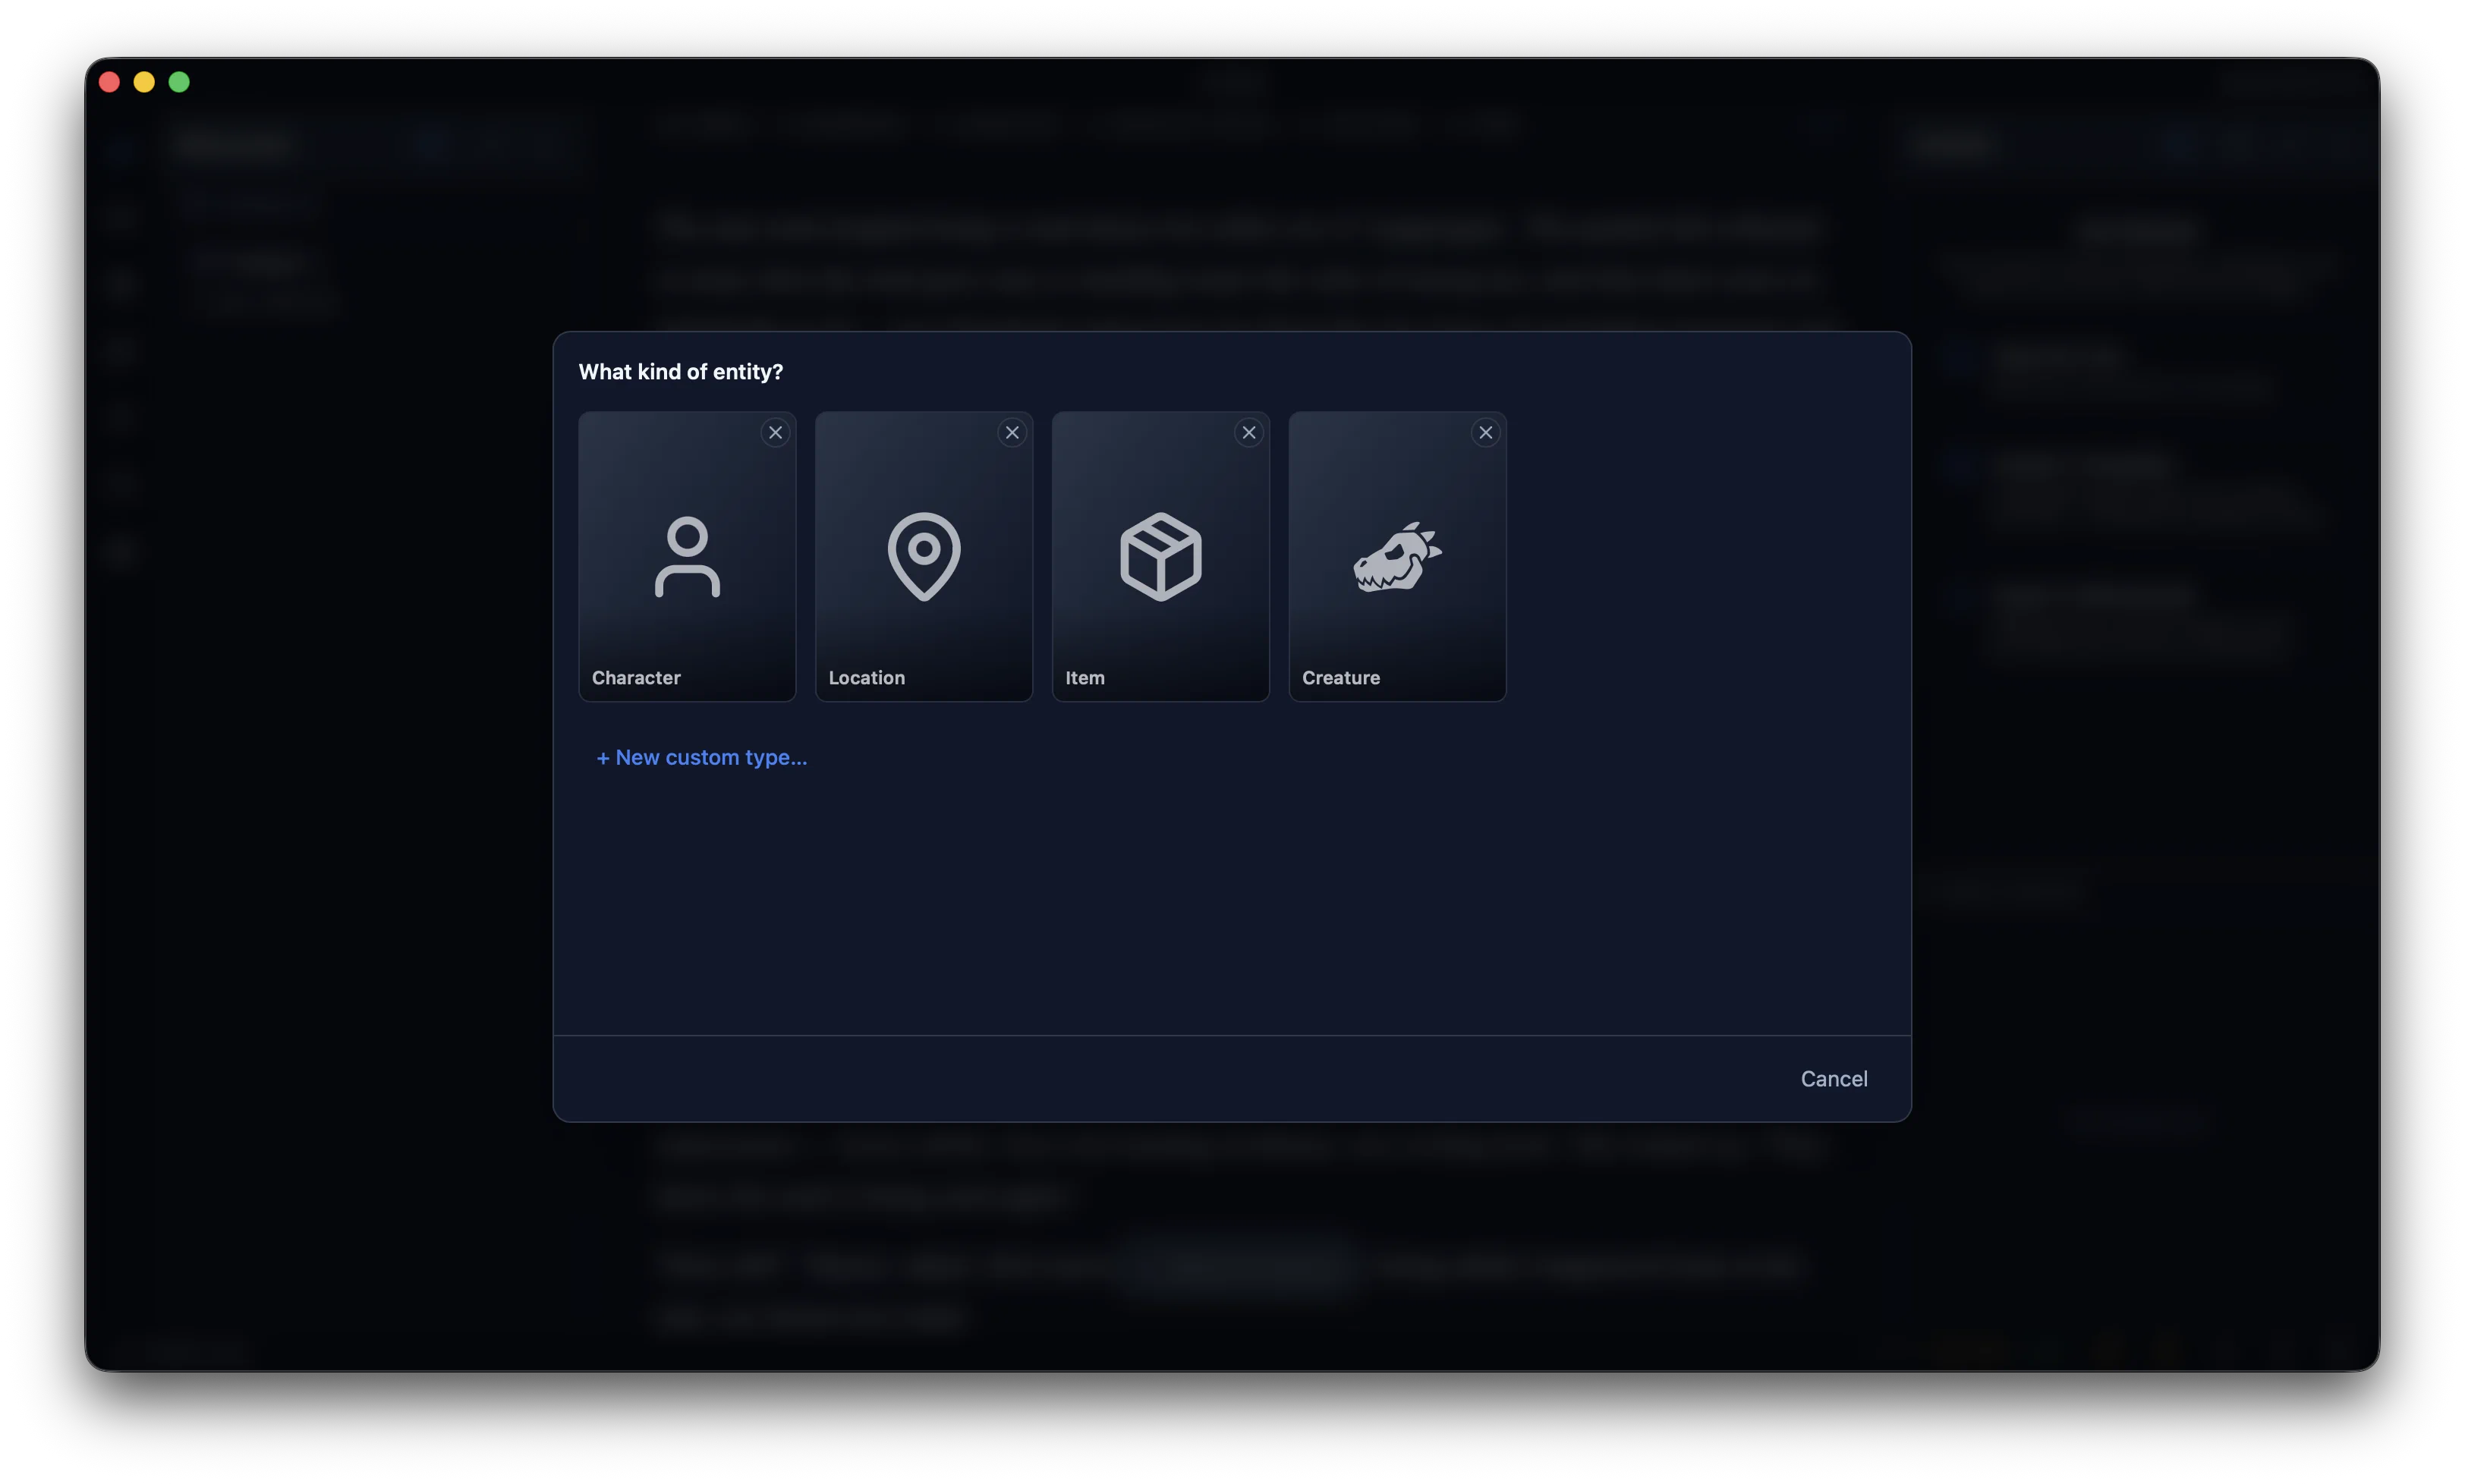
Open it from:
- –The + Add Entity button in the Lexicon
- –The command palette (⌘K) → New Entity
- –Right-click an underlined entity name in prose → Add to Lexicon
- –Select any text in the editor → bubble menu → 📖+ Add to Lexicon
Step 1: Choose an archetype
Each archetype comes with a pre-built property set relevant to that type. Character gets HP, MP, Race, Class, and Level. Location gets Type, Environment, and Danger Level. Item gets Type, Rarity, and Slot. Creature gets Type, Level, and HP. Optional properties are presented as checkboxes. Nothing is forced on you.
Step 2: Name and configure
Give the entity a name and check the properties you want. The wizard creates the template structure automatically. If a template for that archetype already exists in your project, it reuses it, so all characters of the same type share the same structure.
Custom types
For anything beyond the four archetypes (Factions, Skills, Quests, Vehicles), choose New custom type. You name the type and get a blank entity. Add property groups to it later in the Universe, or build the template first and create entities from it.
Event Types & Actions
Event types and actions are both defined in the Universe and used in the event editor. They serve different purposes: event types organize and color-code your event log, while actions define the named vocabulary of things that can happen in your world.
Event Types
An event type is a labeled category with a color and icon. Every event you record gets an event type, and that type is used throughout the Timeline for visual organization and filtering. Combat events show red, Level Up events show gold, Social events show blue. At a glance you can see the shape of a chapter.
The LitRPG vocabulary pack seeds 11 event types: Combat, Level Up, XP Award, Loot, Rest/Recovery, Travel, Social, Magic, Status Effect, Crafting, and System. You can add, edit, or delete types from Universe → Event Types. Create custom types for anything your world needs (Rift Incursion, Qi Cultivation, Tribulation) and assign them a color and icon that matches.
Actions
An action is a named narrative primitive: the vocabulary of world-state changes. Examples from the LitRPG pack: Melee Attack, Ranged Attack, Cast Spell, Level Up, Pick Up Item, Use Item, Take Damage, Apply Status. When you record an event, you select an action to describe what happened.
Each action can have a delta pattern: a pre-configured set of effect fields that load when you pick the action in the event editor. A “Take Damage” action configured with a HP modifier means you only need to fill in the amount; the property and direction are already set. The LitRPG pack seeds 14 actions with empty delta patterns. Configure them once to match your world’s property setup and they speed up every event you record after that.
Add custom actions from Universe → Actions → + New. Name it, link it to an event type for default color coding, and optionally configure a delta pattern.
Capabilities
Capabilities are labels you assign to templates that declare what entities of that type can do (be carried, be traversed, contain other entities) and automatically provisions the relevant properties on the template so you don’t have to add them by hand.
Assign capabilities to a template in the Universe → open the template → Capabilities tab. Child templates inherit their parent’s capabilities and can suppress individual ones if the child type is an exception.
The five capabilities
Active
This entity can act on other entities. Provisions a possible_targets property (a list of entity types this entity can target). Use for characters, monsters, skills, spells, anything that initiates an action on something else.
Common uses: Character, Skill, Spell, Ability
Attachable
This entity can be placed into slots on other entities. Provisions a slot_types property that defines which slot types this entity can fill. Use for gear, accessories, runes, mods: anything that goes into an equipment slot.
Common uses: Weapon, Armor, Ring, Rune
Carriable
This entity can be picked up and carried. Provisions weight, stack_size, and value properties. Use for items in inventory: consumables, loot, crafting materials.
Common uses: Item, Consumable, Loot, Material
Fillable
This entity can contain other entities. Provisions capacity and an accepts property that defines which entity types it can hold. Use for containers, bags, chests, pouches.
Common uses: Bag, Chest, Quiver, Pouch
Traversable
This entity is a location that can be entered or moved through. Provisions a parent_location property linking it to a containing location. Use for any entity that exists in physical space: regions, towns, dungeons, rooms.
Common uses: Region, City, Dungeon, Room
Combining capabilities
A template can have multiple capabilities. A Bag of Holding template would be Carriable (it has weight and value) and Fillable (it can contain items). A Dungeon Boss would be Active (it can act on characters) and Traversable (it occupies a location). Assign as many as apply.
Suppressing inherited capabilities
If a child template inherits a capability from its parent but shouldn’t have it, suppress it in the Capabilities tab. A Cursed Sword template inherits Carriable from its Weapon parent, but suppressing Carriable means weight, stack_size, and value won’t appear on entities of that type.
Context Panel
The Context Panel is docked to the right of the editor and surfaces entity data scoped to wherever you are writing (by paragraph, scene, or chapter). As you type, it shows which entities are present and what their current state is, without requiring you to leave the editor.
Each entity card in the panel shows live property values. A skill entity shows Cost, Type, Cooldown, and Effect; a location entity shows History and Key Events. The panel has three scope levels (This Block, This Scene, Elsewhere in Chapter) and three filter modes (All, Mentioned, Affected).
At the bottom of the panel, the World Timeline mini-panel shows events within the current scope. Hovering an event shows the full property delta. Clicking it jumps the editor to the block where that event was recorded.
Editor Toolbar
Select any text in the manuscript and a context toolbar floats above the selection. It has two groups separated by a vertical rule: formatting on the left, world-building on the right.
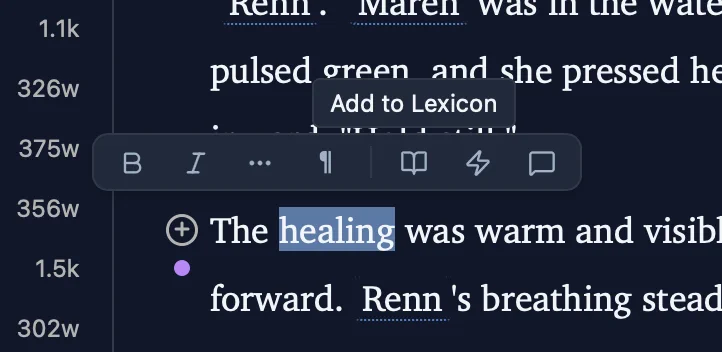
Format group
- – Bold / Italic Direct mark toggles. Active state is highlighted.
- – More Overflow marks: Strikethrough, Underline, Superscript, Subscript, Inline Code, and Clear All Formatting.
- –¶▾ Block type: Switch the current block to Paragraph, Heading 1–3, Block Quote, Code Block, or System Message. Alignment controls sit at the bottom of the picker. The button label reflects the current block type dynamically.
Understory group
- – Add to Lexicon Opens the entity creation wizard with the selected text pre-filled as the entity name. If the text already matches a known entity, the button switches to View in Lexicon and opens the entity sheet instead.
- – Add Event Opens the event editor anchored to the current paragraph, with the selected text passed as context. Fastest path from prose to a recorded world-state change.
- – Add Comment Attaches an inline markup comment to the selection. Comments appear in the Journal, are invisible in exports, and can be tagged to entities with @Name.
Find & Replace
Two modes: a chapter-scoped inline bar (⌘F) and a manuscript-wide Search panel (⌘⇧F). The manuscript-wide panel shows results grouped by chapter and scene with prose excerpts.
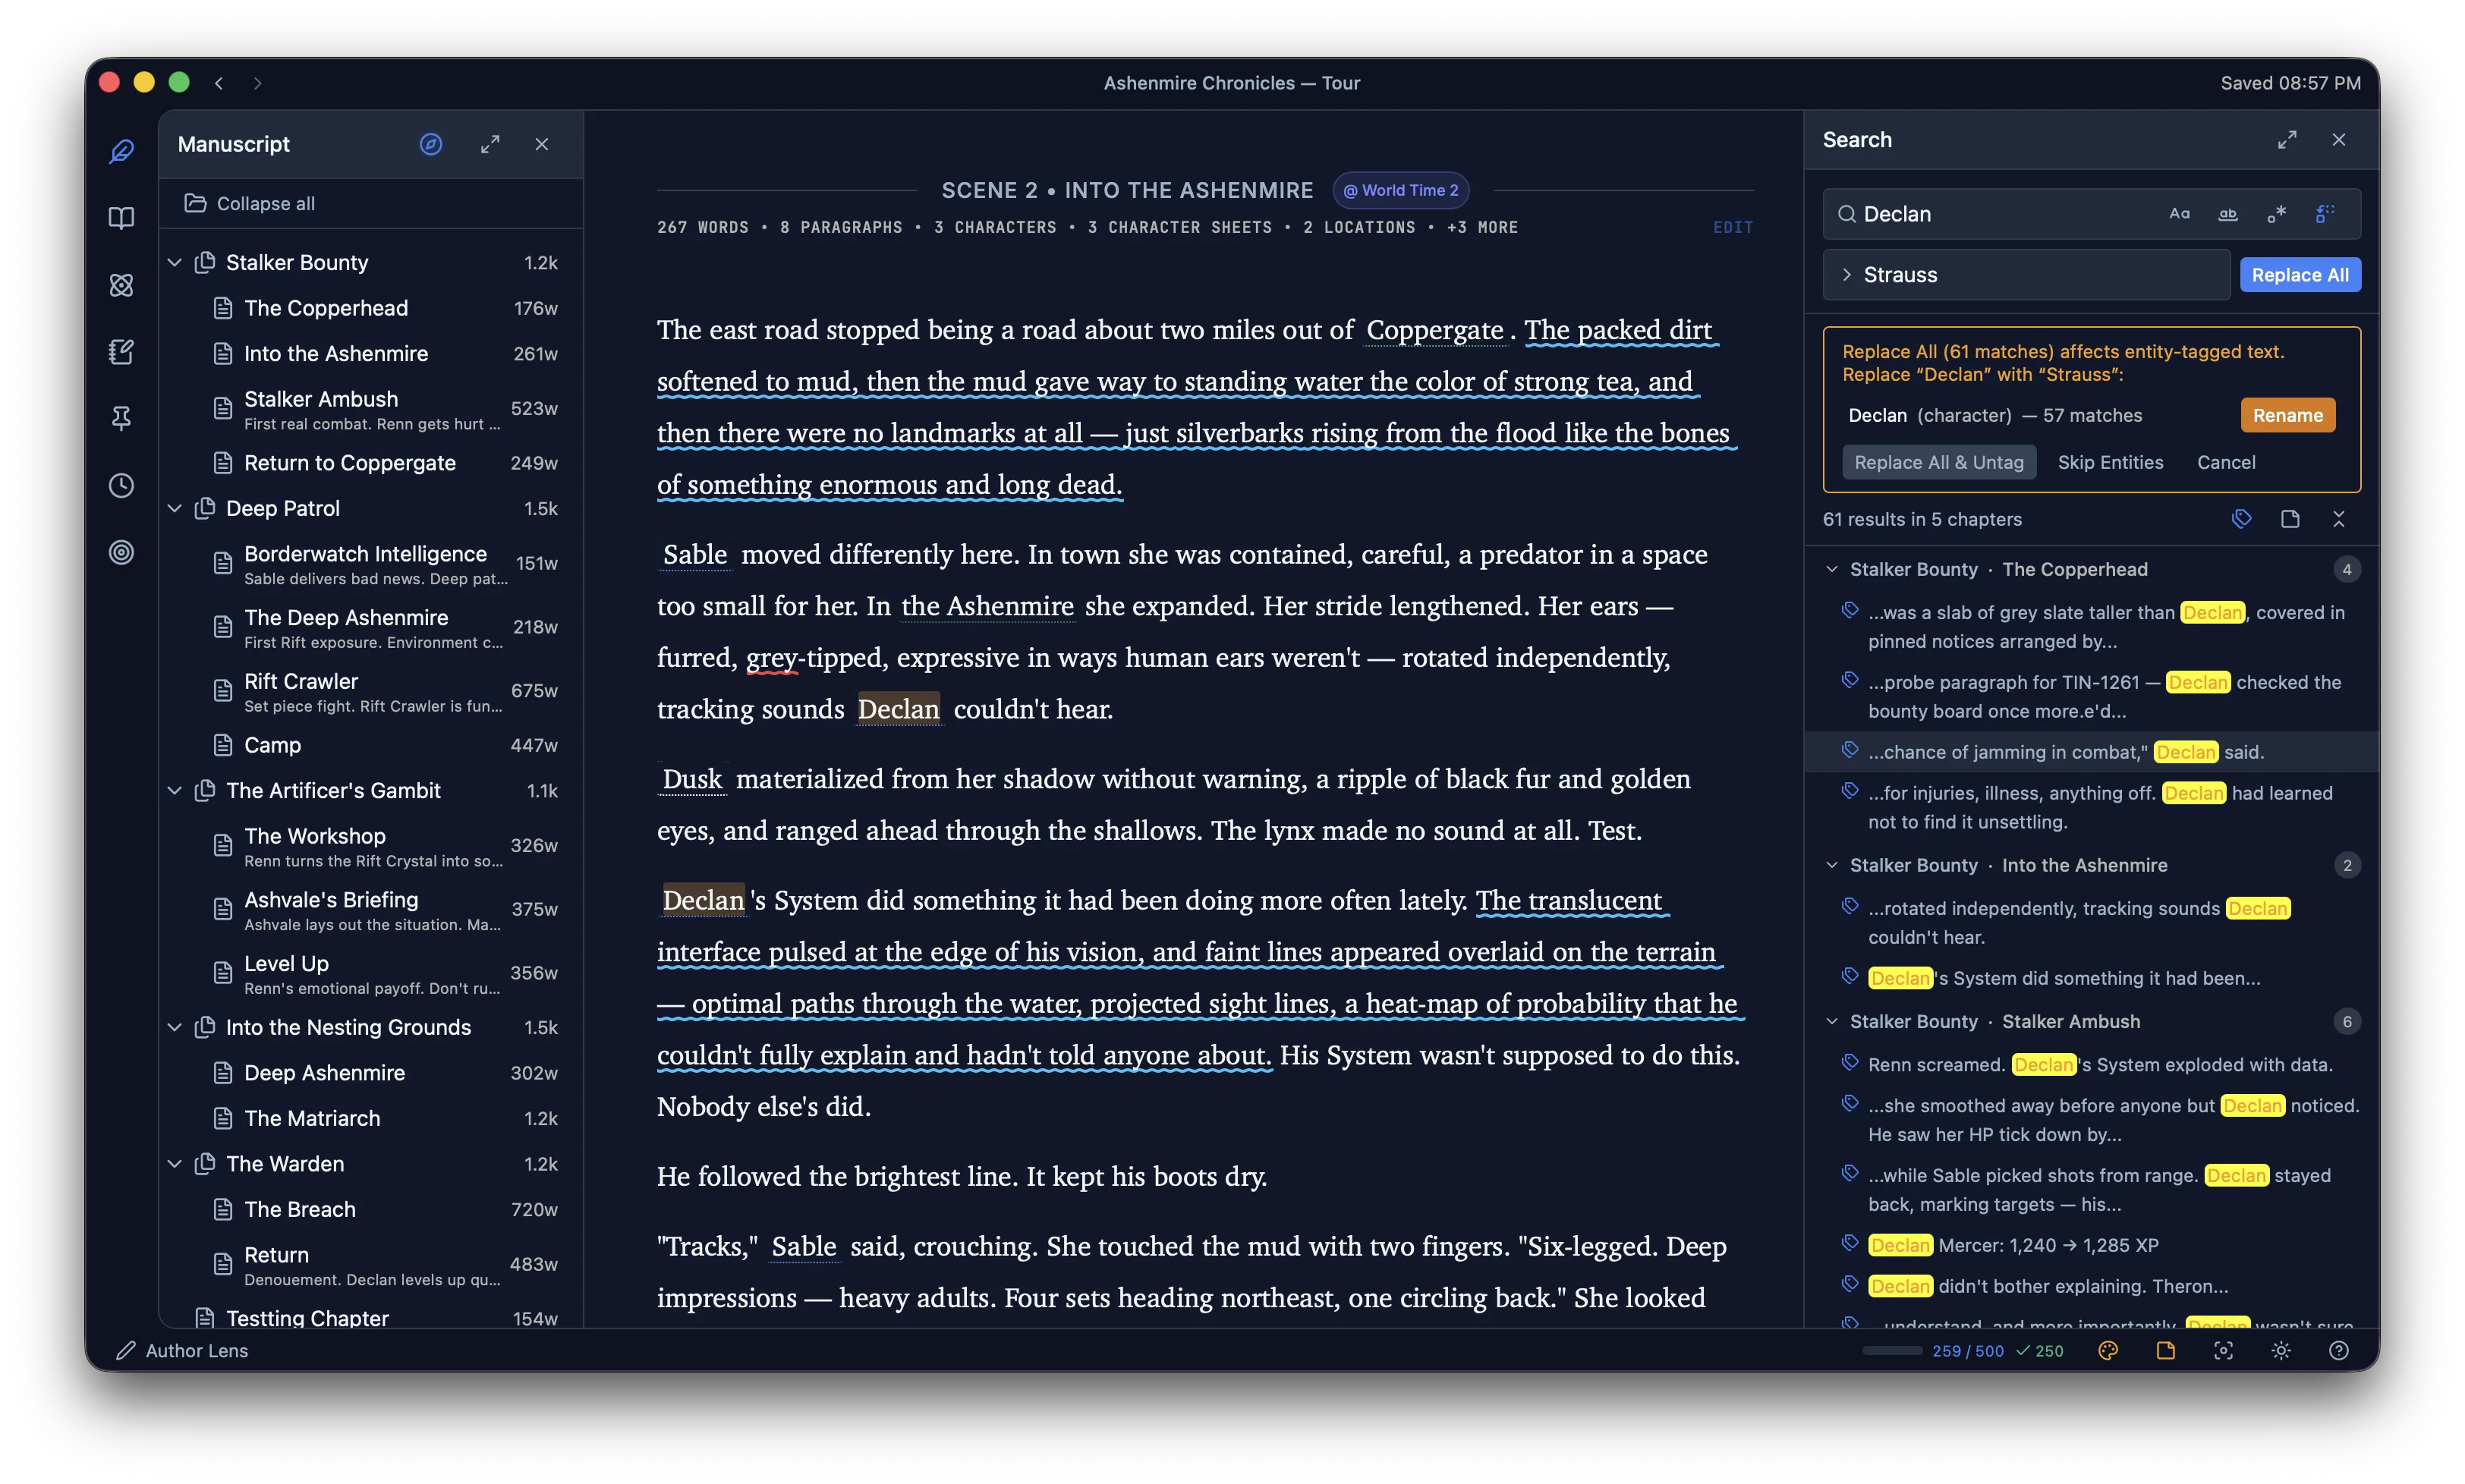
Entity-aware rename
When a Replace All action would affect text that is entity-tagged in prose, Understory intercepts and surfaces a disambiguation dialog. For each affected entity it offers: Rename (renames the Lexicon entry and updates all tagged occurrences (the entity record, event history, and relationships are preserved), Replace All & Untag (replaces the text everywhere and removes entity tags), or Skip Entities (replaces only untagged occurrences). Renaming a character mid-series is a single action.
Import & Export
Import
Understory imports DOCX, Markdown, EPUB, Scrivener, and plain text. The import wizard maps your existing document structure to Understory’s arc/chapter/scene hierarchy and then runs the Discovery scanner on the imported manuscript, surfacing entity candidates for you to review and add to the Lexicon. Nothing is created automatically.
Export
Export the manuscript as Markdown or Plain Text via File → Export Manuscript (⌘⇧E). Markdown preserves bold, italic, headings, and stat block tables. Plain text renders everything as clean copy. Export is manuscript-only; it does not export entity data or event logs. EPUB, PDF, and DOCX export are planned for v1.
Draft History
Draft History is a project snapshot system: RPG-style save slots for your manuscript. Three categories: named drafts you create manually (milestone saves like “before the big rewrite”), shutdown drafts created automatically each time the app closes, and auto drafts created at intervals.
Access via the Command Palette (⌘K). Each draft captures word count, entity count, event count, chapter count, and timestamp. Actions per draft: restore, branch (create a new project from this state), rename, or delete.
Settings
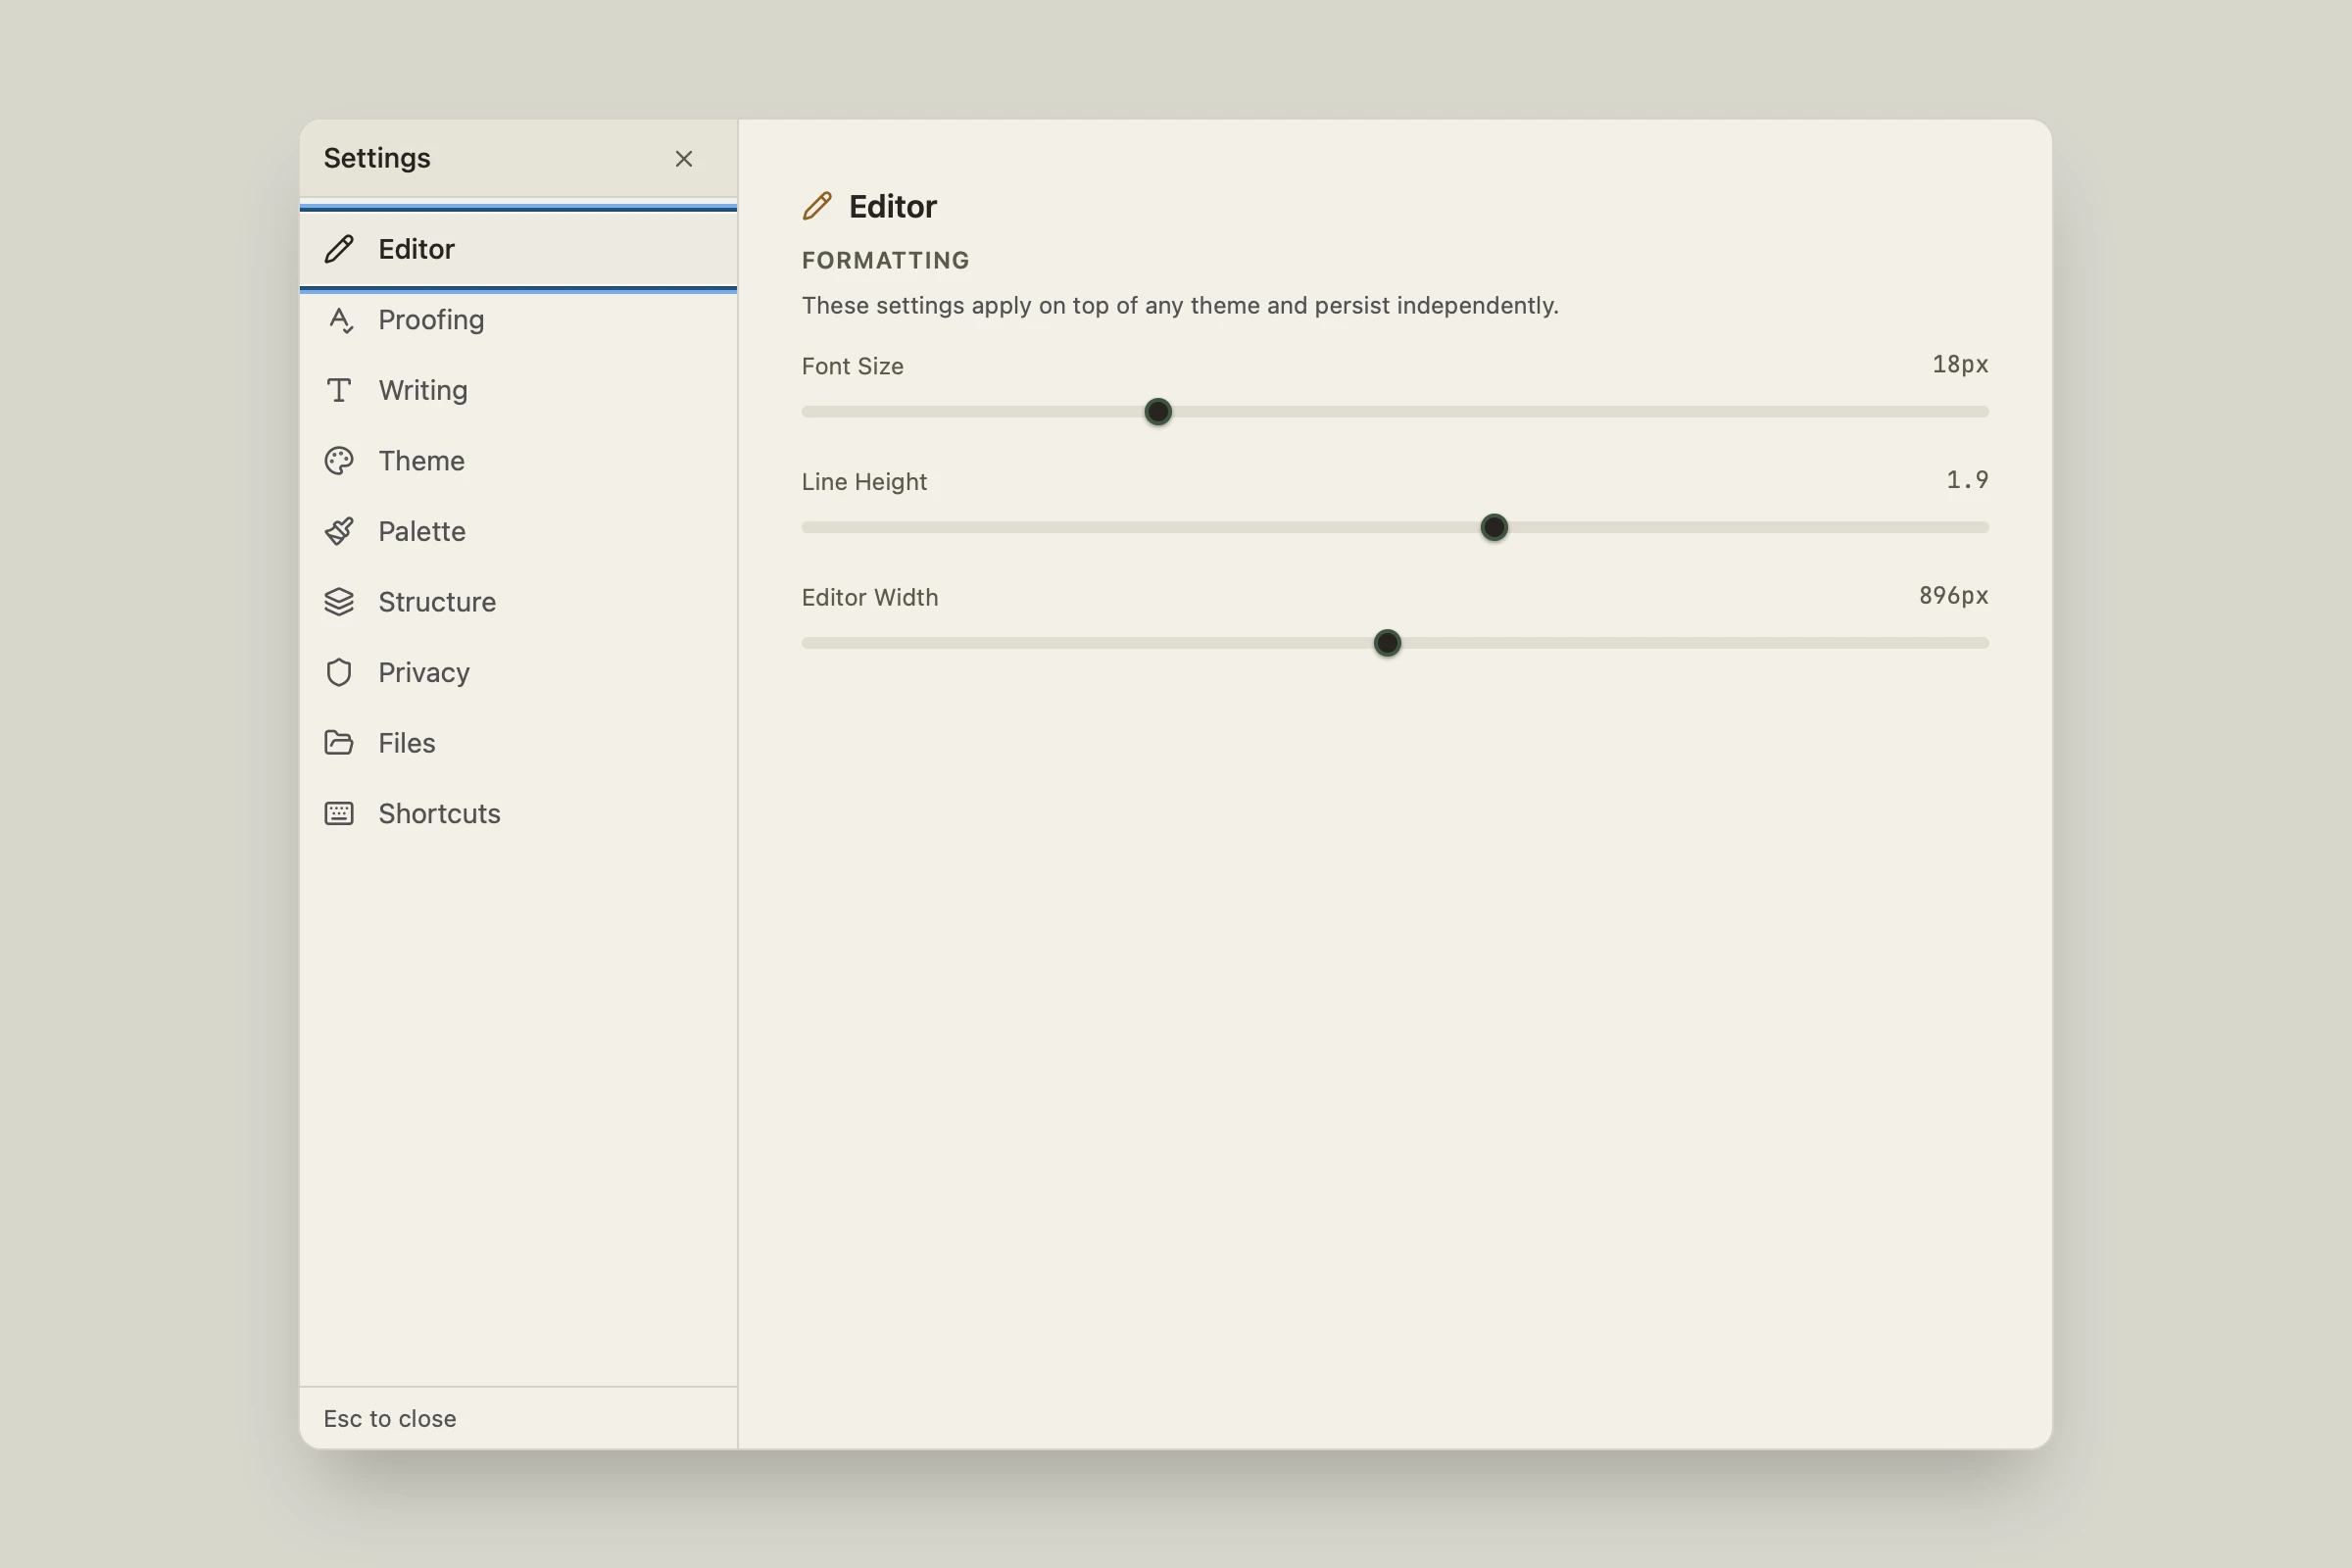
Settings is a single panel with a side-nav, replacing the old preferences modal and the standalone Theme Manager. It opens as a centered overlay over whatever you were doing. Eleven sections, in order:
Theming & Appearance
Understory ships with four built-in themes: Codex, Parchment, Neon, and Focus, each with its own light and dark variant plus a System option that follows your OS setting. Click a swatch to activate it immediately.
Every theme exposes 27 individually customizable color tokens, from background and text to entity badge colors, each with a live hex value and a WCAG contrast badge (AA or Fail) so you can see whether your changes stay legible. Font family, size, line height, and editor width live in Settings → Editor, not here; they apply on top of whichever theme is active.
Creating a custom theme
Open Settings and pick a starting point
Click Edit Colors
Adjust individual tokens
Duplicate, export, or delete
Grammar & Spell Check
Understory runs Harper, a Rust-native grammar and spell checker, directly in the editor. Misspellings get a red wavy underline; grammar issues (subject-verb agreement, that kind of thing) get a blue one. Checks run about 500ms after you stop typing, not on every keystroke, and a chapter is fully checked as soon as you open it.
Right-click a flagged word to see suggestions at the top of the context menu. Click one to apply it. If Harper has no suggestion, or the word is correct but unfamiliar, the same menu offers Add to Dictionary, which whitelists it for the rest of the project and persists across restarts.
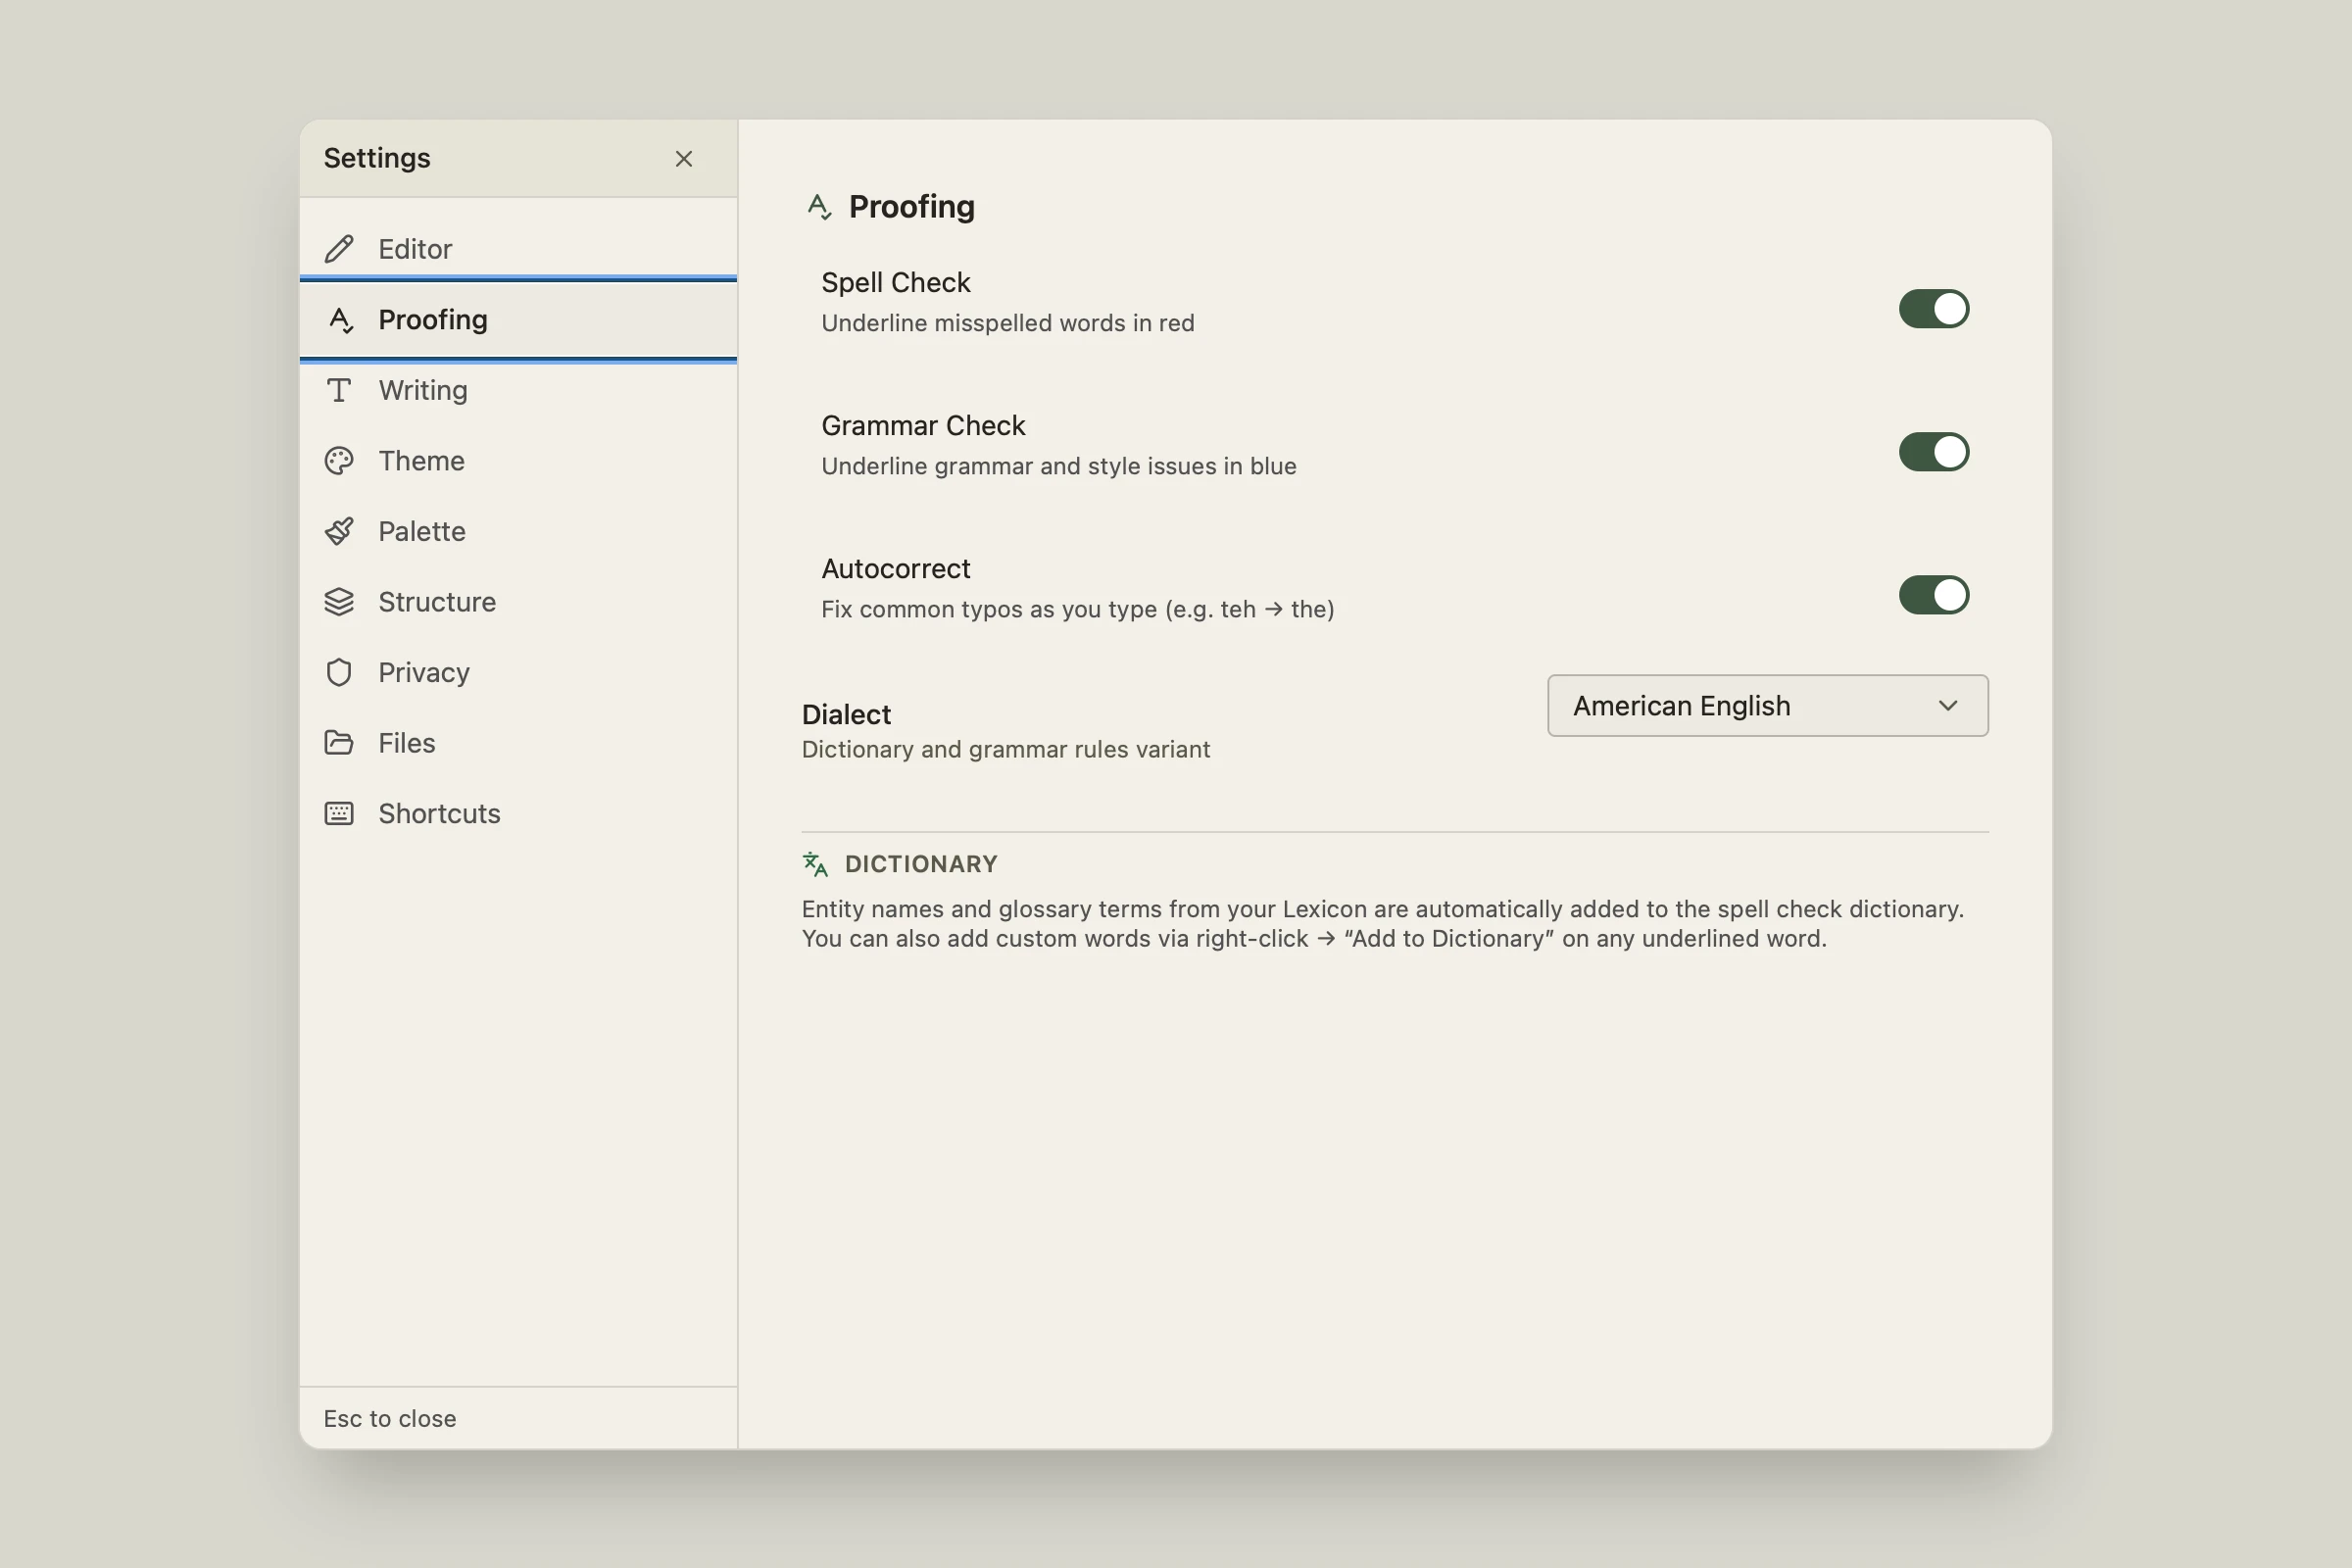
You rarely need the manual dictionary for names: every entity name and alias in your Lexicon is automatically whitelisted. Rename or delete an entity and Harper’s dictionary updates with it, so a renamed character’s old name starts getting flagged again.
In-World Glossary
Not to be confused with the app-terminology Guide Glossary at the end of this guide. This is a real entity type: a Glossary Term for words your world invents, tech names, slang, units of measurement, anything a reader might need defined.
A Glossary Term has a name, optional aliases, a Definition field, and a Usage Notes field for how the term is actually used in-story versus its strict meaning. Create one by selecting a word, right-clicking, and choosing Add to Lexicon → as Glossary Term from the submenu, or via the command palette’s Add Glossary Term command.
Glossary Terms show up in the Context Panel with their own badge, and browse alongside every other entity in the Lexicon. They’re a real part of your world model, not a separate wiki.
Smart Typography
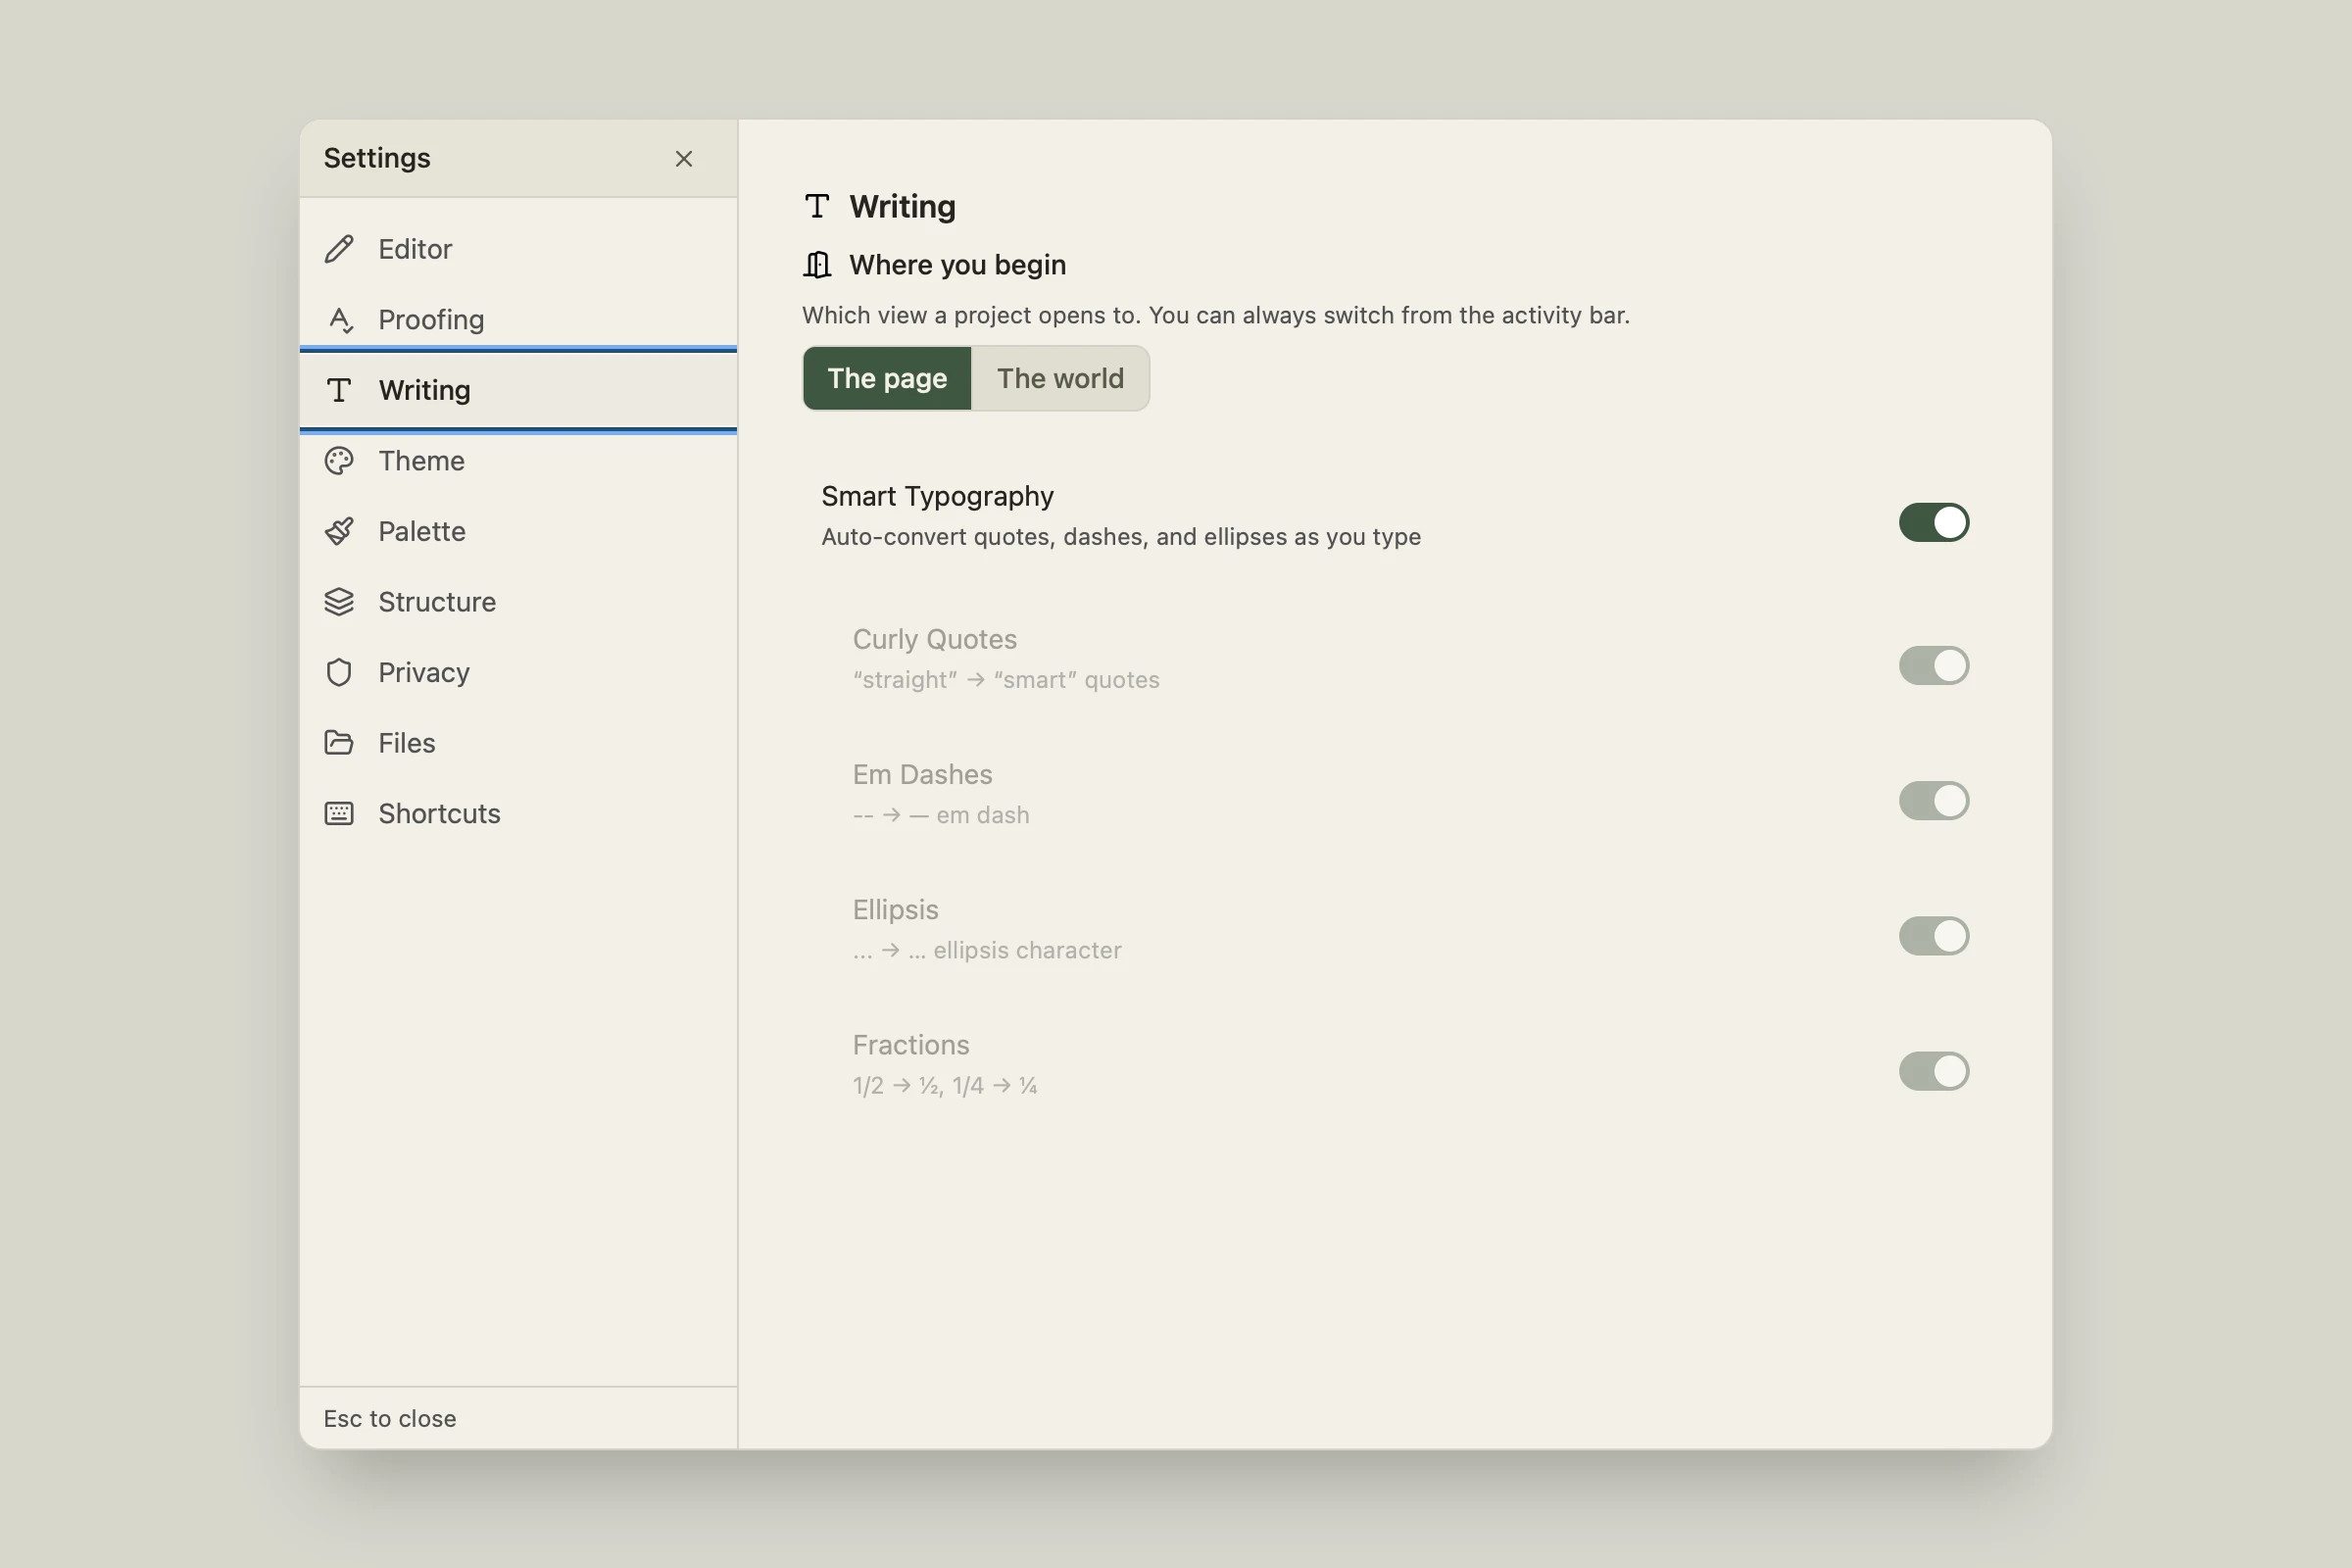
Understory converts straight quotes to curly quotes and apostrophes, double hyphens to em dashes, three dots to an ellipsis, and common fractions (1/2, 1/4, 3/4) to their typeset forms as you type. Code blocks are never touched. Each conversion has its own toggle, plus a master switch, under Settings → Writing, per-project, so a co-written or imported manuscript with different house style doesn’t fight you. Turn the whole thing off from the command palette with Toggle Smart Typography without leaving the editor.
Game Design Recipes
Adding and managing property groups
Property groups are the building blocks of your world model. Before you can track HP, Level, or STR on an entity, you create a group that holds those properties, then attach it to the templates that need it. The same group can appear on multiple templates. Edit it once and every template that uses it updates automatically.
Open the Universe and create a group
Add properties to the group
Attach the group to a template
Edit once, update everywhere
Property types
Number
Integers and decimals. HP, gold, XP, attack bonus. The most common type in LitRPG builds.
String
Freeform text. Background, title, description, notes. Not tracked by the event ledger. Use Number for anything you want to watch change over time.
Formula
Computed from other properties in the same group. AC = 10 + floor((DEX - 10) / 2). Recalculates automatically when source values change. Read-only on the entity sheet.
Boolean
True/false flag. Is Cursed, Has Flying, Awakened. Useful as unlock conditions in progression tracks.
Entity Link
A reference to another entity. Race, Class, Party, Mentor. Selecting an entity fills the slot. Note: filling a composition slot (not this property type) is what triggers stat grants.
Value Set
A fixed list of choices. Rarity: Common / Uncommon / Rare / Legendary. Element: Fire / Ice / Lightning. Define the options once; all entities using the group pick from the same list.
Composition slots
A composition slot is a typed position on a template that accepts another entity. When you fill a slot, the slotted entity’s property groups merge onto the host entity’s sheet automatically, live, without copying anything. This is how Race bonuses appear on a Character sheet, how a Class defines a character’s skill list, how a Faction affiliation surfaces its bonuses on a member.
The key mental model: composition slots let one entity borrow the structure and values of another. The borrowed data stays live: edit the Race entity and every character using it sees the update.
Worked example: Race and Class
Create Race and Class templates
Add composition slots to the Character template
Create your Race and Class entities
Fill the slots on a character
See changes propagate
Other uses for composition slots
Faction membership
Add a Faction slot to the Character template. Fill it with a Faction entity. The faction's territory, allegiances, and bonuses appear on the character sheet. Reassign the slot when a character changes sides.
Mount or companion
A Mount slot on a Character accepts a Creature entity. The mount's speed and carrying capacity merge onto the character sheet while the slot is filled.
Skill specialization
A Specialization slot on a Skill entity accepts another Skill. Swordsmanship can be specialized into Dueling, which adds its own bonus properties on top of the base skill.
Origin / backstory
An Origin slot accepts a Background entity. The background's starting proficiencies and feature text appear on the character sheet without duplicating them.
Setting up a progression track
A progression track models any advancement through defined milestones: XP leveling, qi core compression stages, faction reputation tiers, weapon awakening ranks. Once created in the Universe, any template can use it. Multiple tracks can run simultaneously on a single character.
Create the track in the Universe
Define tiers
- –Name: Level 1, Level 2, or Bronze, Silver, Gold for a reputation track
- –Requirements (optional): Notes on what should be true before advancing. For your reference when deciding whether to trigger the tier
- –Rewards (optional): Stat bonuses applied when you advance to this tier (+50 HP, +10 MP, +1 STR)
For a simple 3-tier setup: Tier 1 is the starting tier. Tier 2 rewards +50 HP, +10 MP (advance when your story puts the character at 1000 XP). Tier 3 rewards +75 HP, +15 MP, +1 STR.
Attach the track to a template
Advance a character
Equipment and inventory
Characters in LitRPG carry gear that changes their stats. Understory handles this through two attachment group types: Equipment (a paper doll of structured slots: Main Hand, Off Hand, Armor) and Inventory (a grid of held items). Both are enabled per-template and both use the same stat-grant system.
Enable equipment slots on the Character template
Create an Item entity
Add stat grants to the Item template
Equip the item
Enable inventory for consumables
Derived stats with Formula properties
Formula properties compute their value from other properties in the same group. When STR changes, STR Modifier recalculates. When Level changes, HP Max recalculates. You never update derived stats manually. They stay in sync automatically.
Add a Formula property to a group
Write the formula
floor((STR - 10) / 2)10 + floor((DEX - 10) / 2)8 + PROF + floor((INT - 10) / 2)CON_base + Level * 8STR * 15Read the result on the entity sheet
Buffs and debuffs
Temporary modifiers (Haste, Poison, a Blessing of the Goddess) are events with a duration. The modifier stays active and visible on hover cards and the Context Panel until you explicitly clear it with another event.
Record the buff as a Temporary event
See the active modifier
Clear the buff when it expires
Reference
Glossary
- Entity
- A discrete, named, trackable thing in your story world: a character, location, item, monster, faction, skill. Built from a template, with its own property values and event history. Currently every entity in the Lexicon is a first-class individual.
- Template
- A reusable blueprint that defines the structure an entity takes when created. Specifies property groups, composition slots, and attachment groups. Not an entity itself. Has no values.
- Property Group
- A named set of typed properties (Number, String, Formula, Boolean, Entity Link, Value Set). Defined once in the Universe, shared across templates.
- Event
- A recorded state change in the story world. Every event has a description, actor, event type, and one or more effects (property deltas on one or more entities).
- Event Type
- An organizational category for events, with color and icon coding used throughout the Timeline and event editor. Examples: Combat, Magic, Exploration, Social.
- Action
- A named narrative primitive that defines what can happen: the vocabulary of world-state changes. Actions can carry a delta pattern that pre-configures effect fields in the event editor. The LitRPG vocabulary pack seeds 14 actions with empty delta patterns; configure them to match your world’s property setup.
- Event Ledger
- A sequenced set of deltas: discrete records of every state change in the project. Each delta has a position in the timeline and can be edited, reordered, or deleted. Entity state is never stored directly. It is always computed by replaying ledger events in sequence order through the reducer.
- World-Time
- The in-world chronological position of an event (seq_order). Distinct from manuscript position. An event can happen at World-Time 3 but be written in chapter 12 as a flashback.
- Author Lens
- The default view mode. Sorts events by world time, includes all events including hidden backstory. Shows what actually happened in the world, regardless of what the reader knows yet.
- Reader Lens
- Filters events by manuscript position. Only events at or before the cursor position are included. Shows entity state from the reader’s perspective: what they would know at that point in the story.
- Lexicon
- The browsable catalog of all entities in the project. The place where entities live once created.
- Universe
- Where you define the rules of your world: templates, property groups, relationship types, progression tracks, event types, and actions.
- Composition Slot
- A typed position on a template that accepts entities from another template. Filling a slot merges the slotted entity’s property groups onto the source entity’s sheet. The merged data stays live: editing the slotted entity updates every host that has it in a slot.
- Attachment Group
- An Equipment or Inventory block added to a template. Equipment provides a set of named slots (Main Hand, Armor, Ring, etc.) that accept Attachable entities; filling a slot applies that entity’s stat grants to the host. Inventory provides a grid for Carriable items that are held but not equipped.
- Stat Grant
- A numeric bonus that flows from one entity to another through an equipment slot. Defined as a property on the slotted entity (e.g. a sword with +2 ATK). While the slot is filled the grant appears on the host entity’s sheet attributed to its source. Unequipping removes it immediately.
- Capability
- A label assigned to a template that declares what entities of that type can do. Five built-in capabilities: Active (can act on other entities), Attachable (can fill equipment slots), Carriable (can be picked up and carried), Fillable (can contain other entities), Traversable (is a location that can be entered). Each capability auto-provisions relevant properties on the template.
- Delta Pattern
- A pre-configured set of effect fields stored on an action. When you select an action in the event editor, its delta pattern pre-fills the effect type and target property so you only need to enter the value. Configured per-action in the Universe.
- Progression Track
- A sequence of named tiers that models advancement: XP leveling, reputation stages, weapon awakening ranks. Each tier can specify requirements (what should be true before advancing) and rewards (stat bonuses applied when you advance). Tracks are defined in the Universe and attached to templates. Advancement is always author-triggered.
- Temporary Modifier
- A time-limited stat effect applied via an event: a buff, debuff, poison, or blessing. Visible in hover cards and the Context Panel as an active modifier until explicitly cleared by another event. Distinct from permanent effects, which persist indefinitely, and from stat grants, which are tied to equipment slots.
- .weave file
- The single-file local project format. Everything in a project (manuscript, entities, event ledger, Universe) lives in one
.weavefile. Local-first, no account required.
Questions not answered here? Join the Discord. Rob is there daily.
Free during alpha · No account required